Notifications are one of the most important things on apps today. It allows you to engage and reengage your users but also receive realtime data. Without it most of apps would be completely useless.
Notifications are the key of many apps success like Facebook, Twitter, Instagram, WhatsApp, etc. That's how you invite your users to come back to your app and reengage with it.
In this article we will see how it works in Flutter for both iOS and Android and how do we handle them with Firebase.
Understanding the difference between push and local notifications
First, let's see the difference between local notifications and push messages
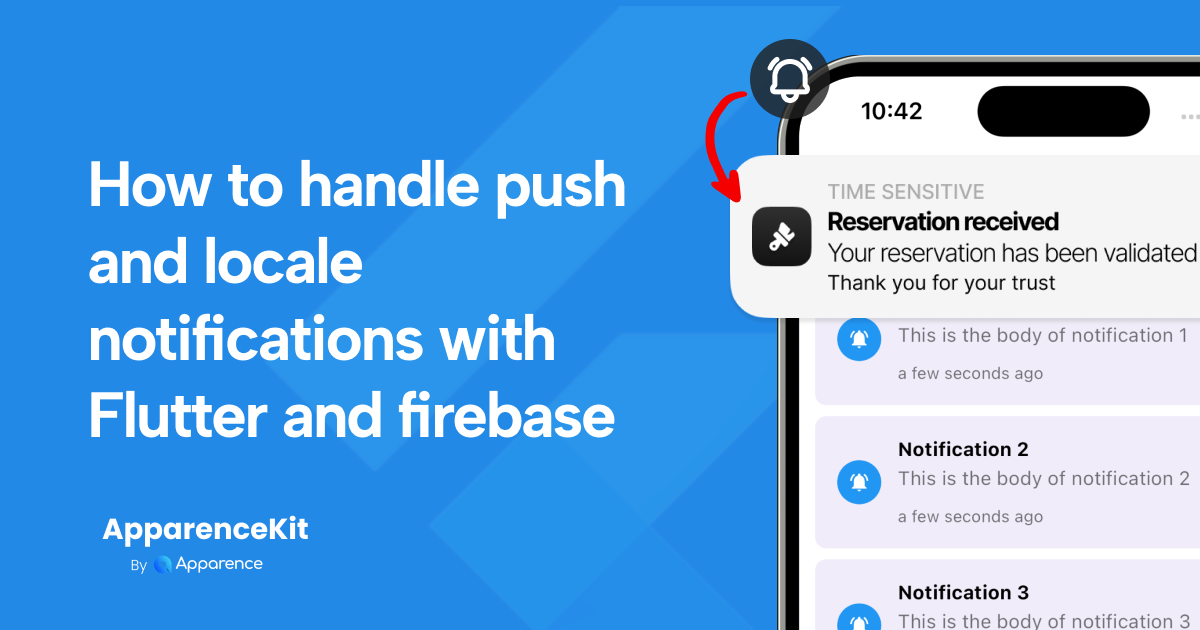
Firebase will send a push notification to your phone then will show or not a local notification message that is shown to the user like this.
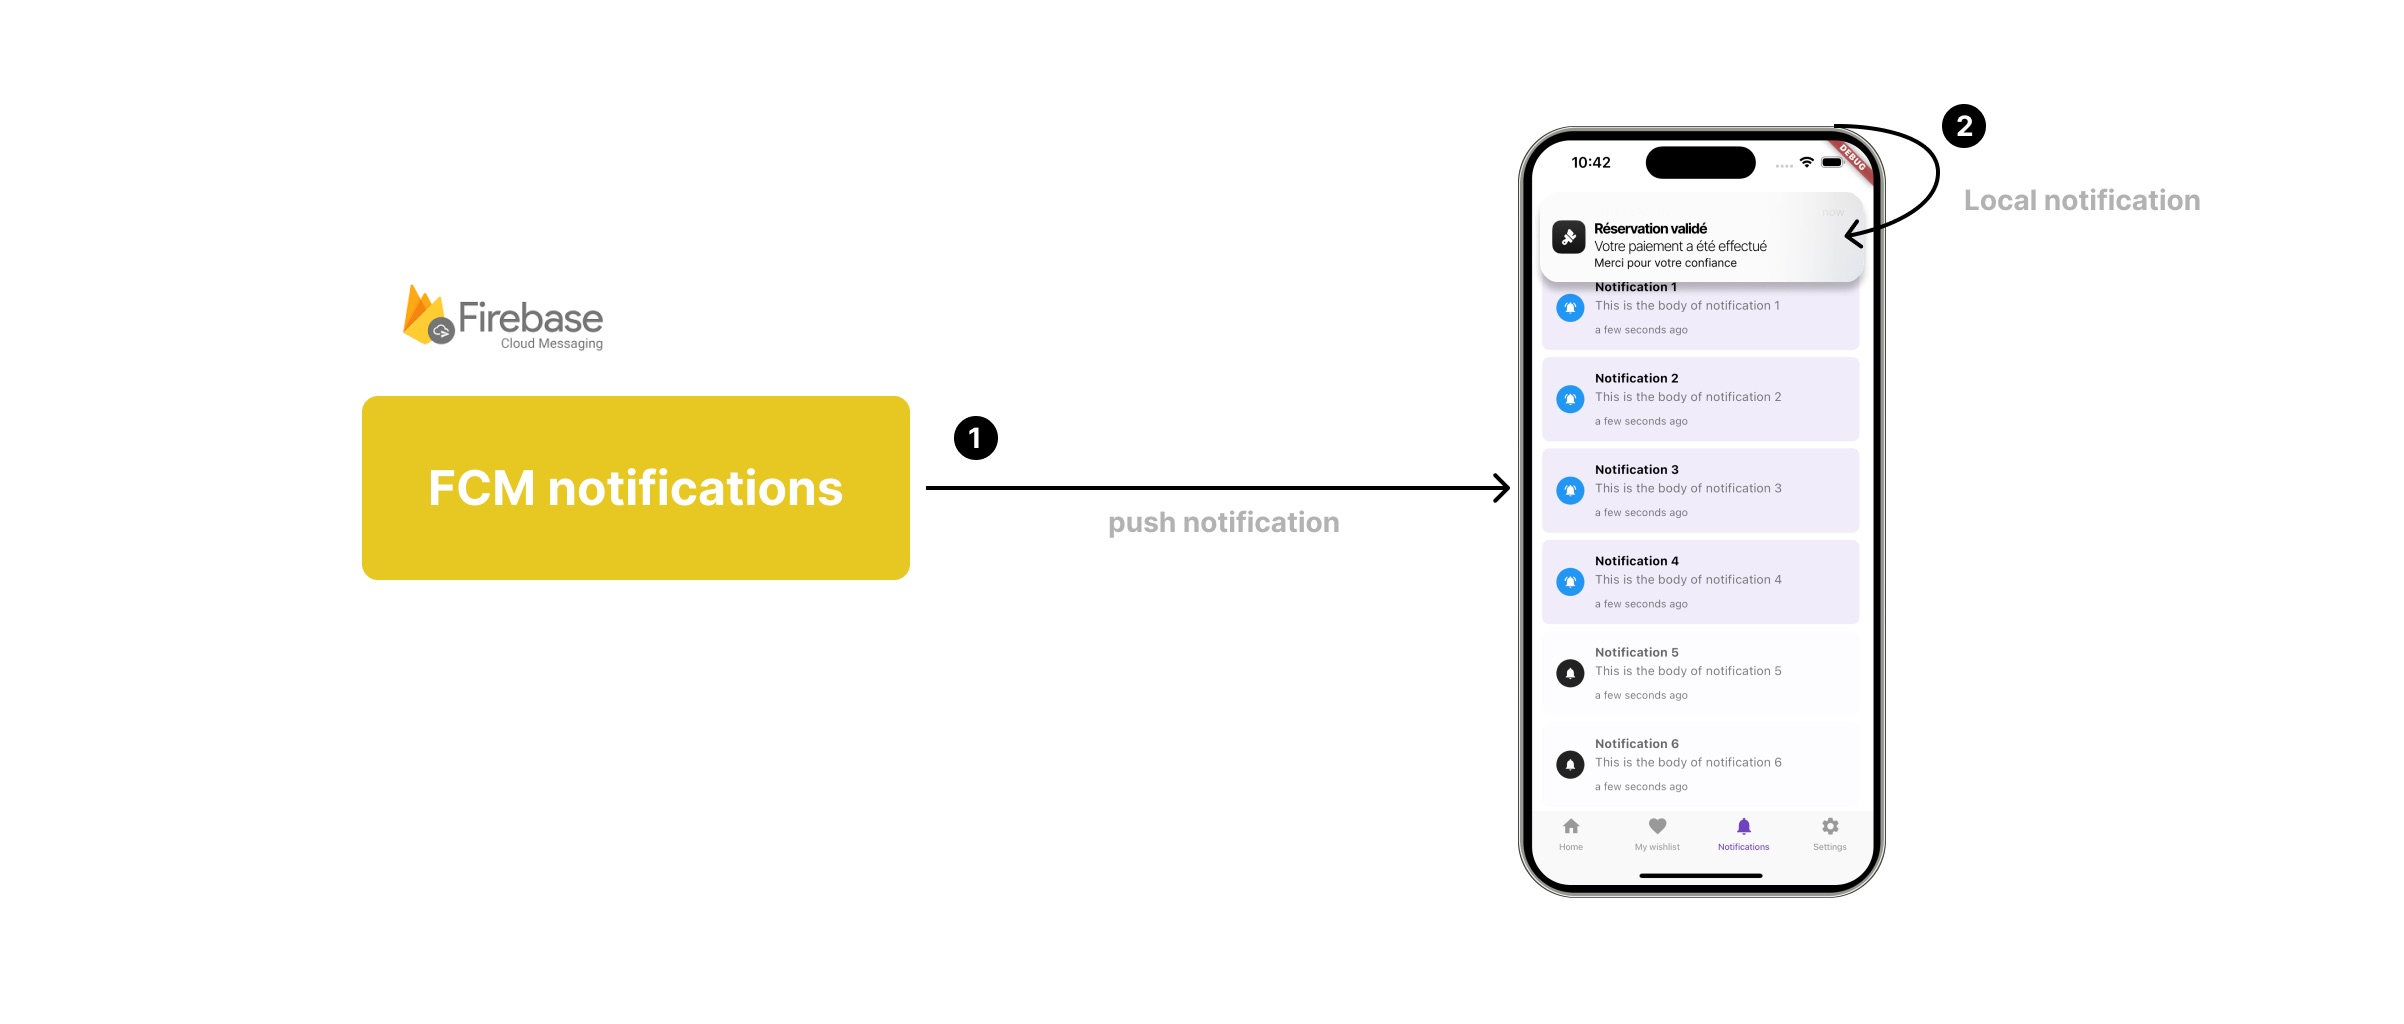
Every time you receive a push notification, your phone will not show a local notification. That's up to you to show it or not. A push notification can also be used to update your app in realtime.
For example, if you are using a chat app, you will receive a push notification when someone sends you a message. Then, you will show a local notification to the user to inform him that he received a new message.
How push notifications works?
Ask user permission
Push notifications are sent by a server to your phone. It can be sent by Firebase, OneSignal, etc... Then, your phone will receive it and show it to the user if you want to.
Today we will only see how it works with Firebase.
But that’s not magic and you have some things to do before that. The first thing is to ask for user’s permission.
This can be done by simply calling this method from the firebase messaging plugin.
import 'package:firebase_messaging/firebase_messaging.dart';

FirebaseMessaging.instance.requestPermission();
This will shows a nice popup to your users according to the platform.
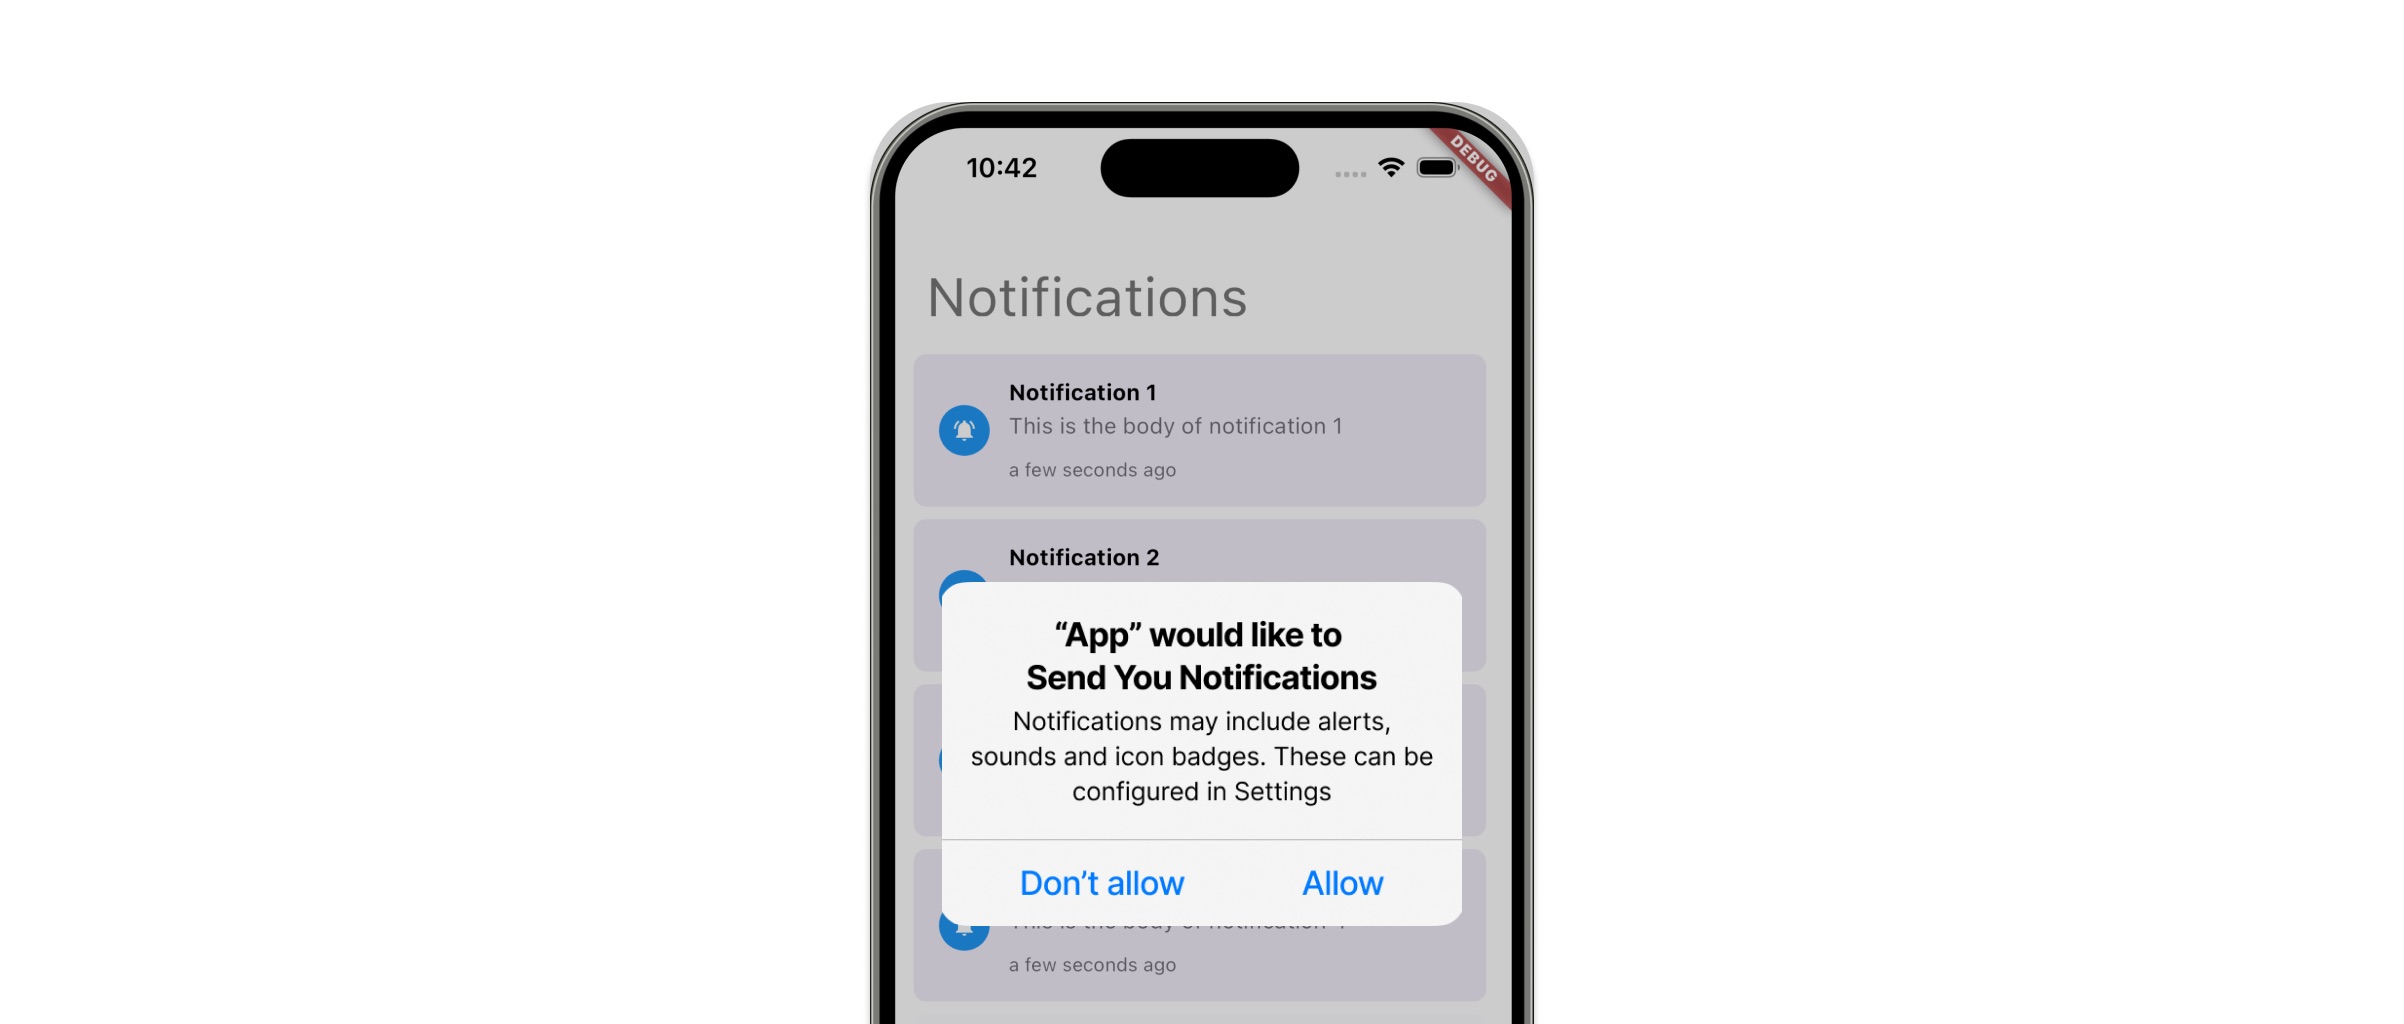
For notifications I like to ask it right after app launches or after he has signed in. And that’s the same on iOS, Android and web.
Manage user permission on iOS, Android and web
We used to have to handle notifications settings in each apps.
That’s not the case anymore.
You don’t have to write your own notifications settings page.
Every OS now handles notifications permissions for each apps.
If a user refuse them, he has to go in his OS settings to enable them.
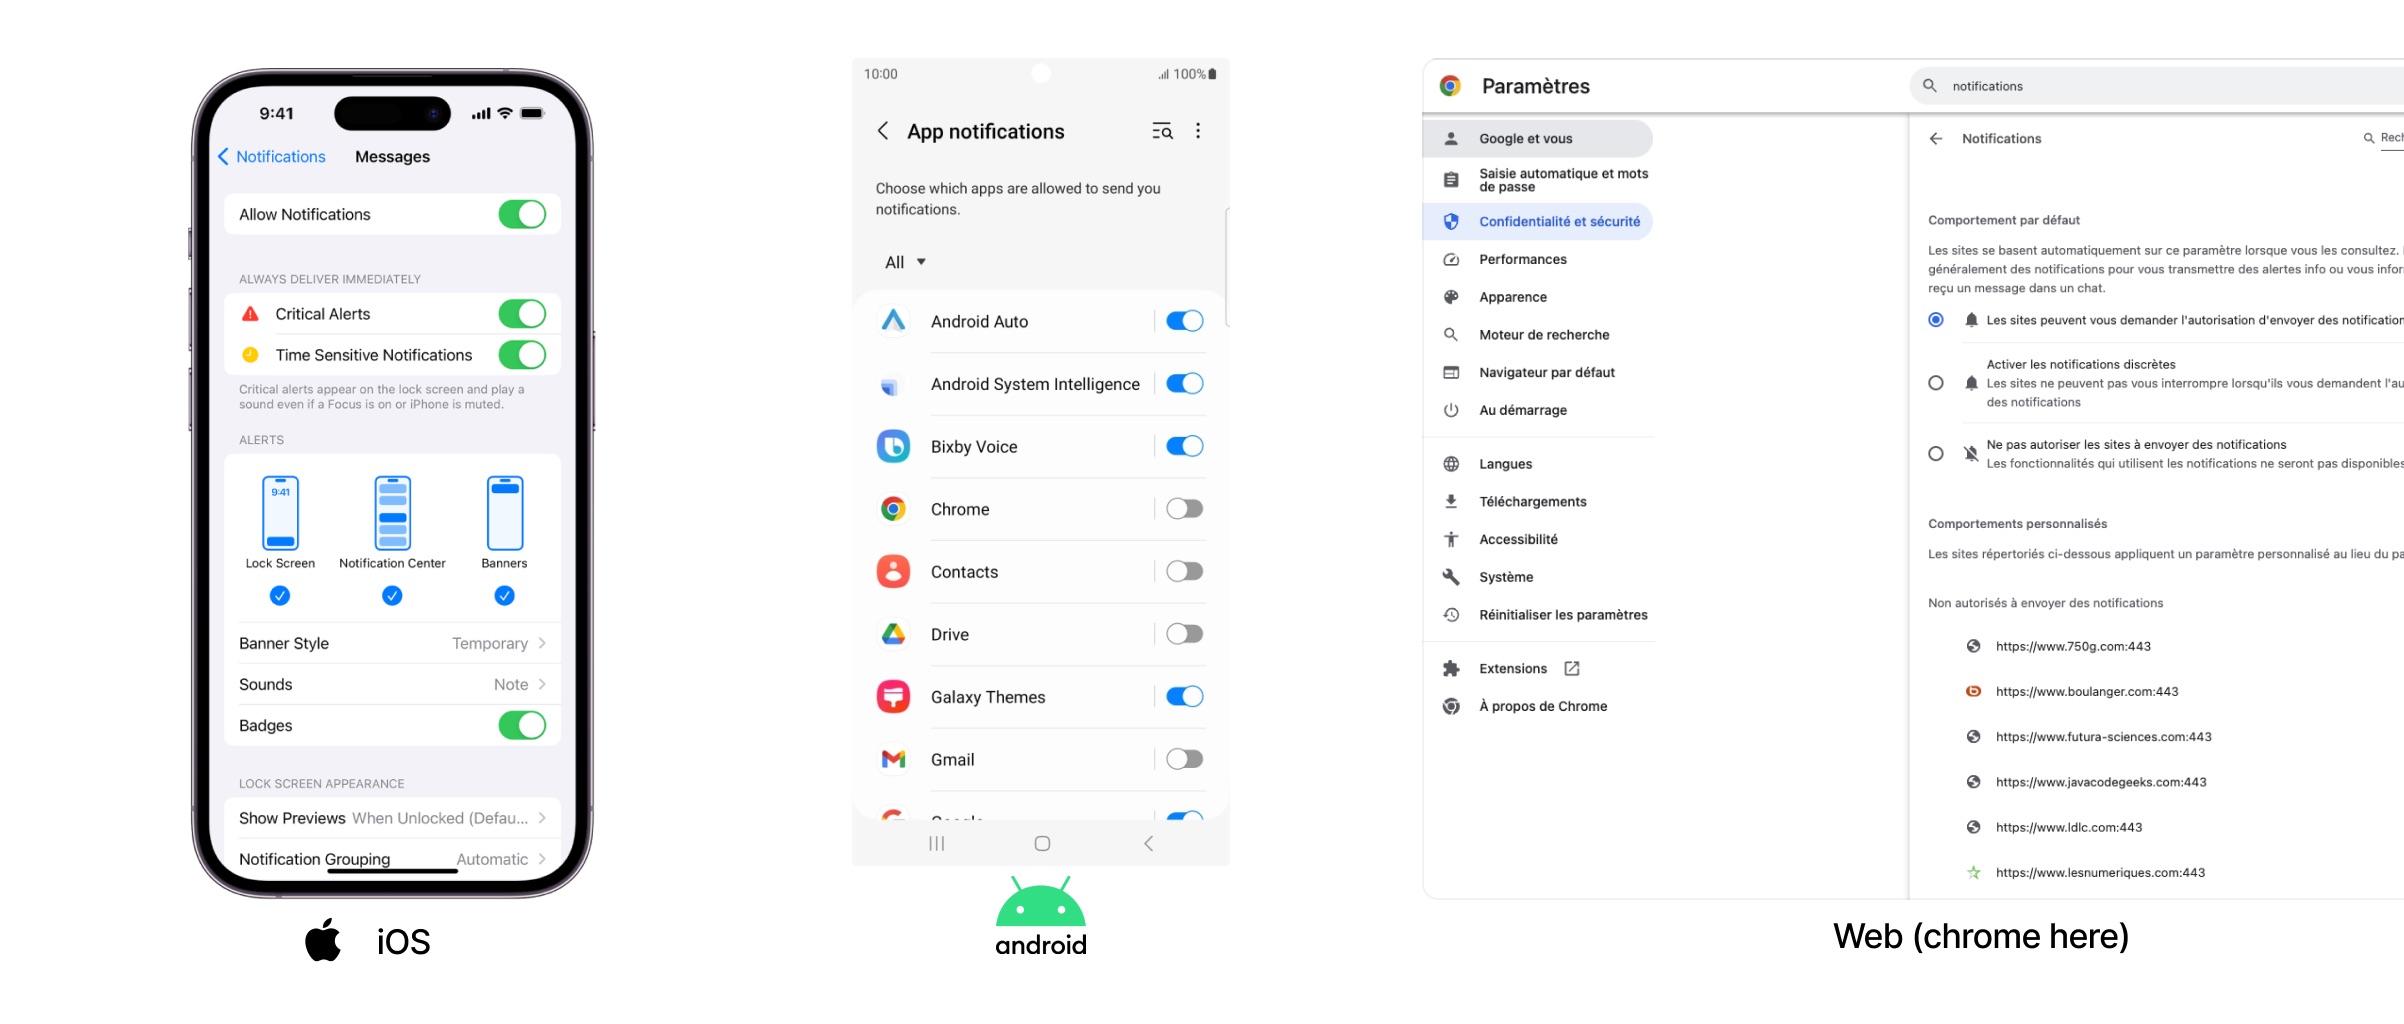
It's up to users to enable or disable notifications for each apps.
Register your device to Firebase Cloud Messaging
So how does it work after user accepts notifications?
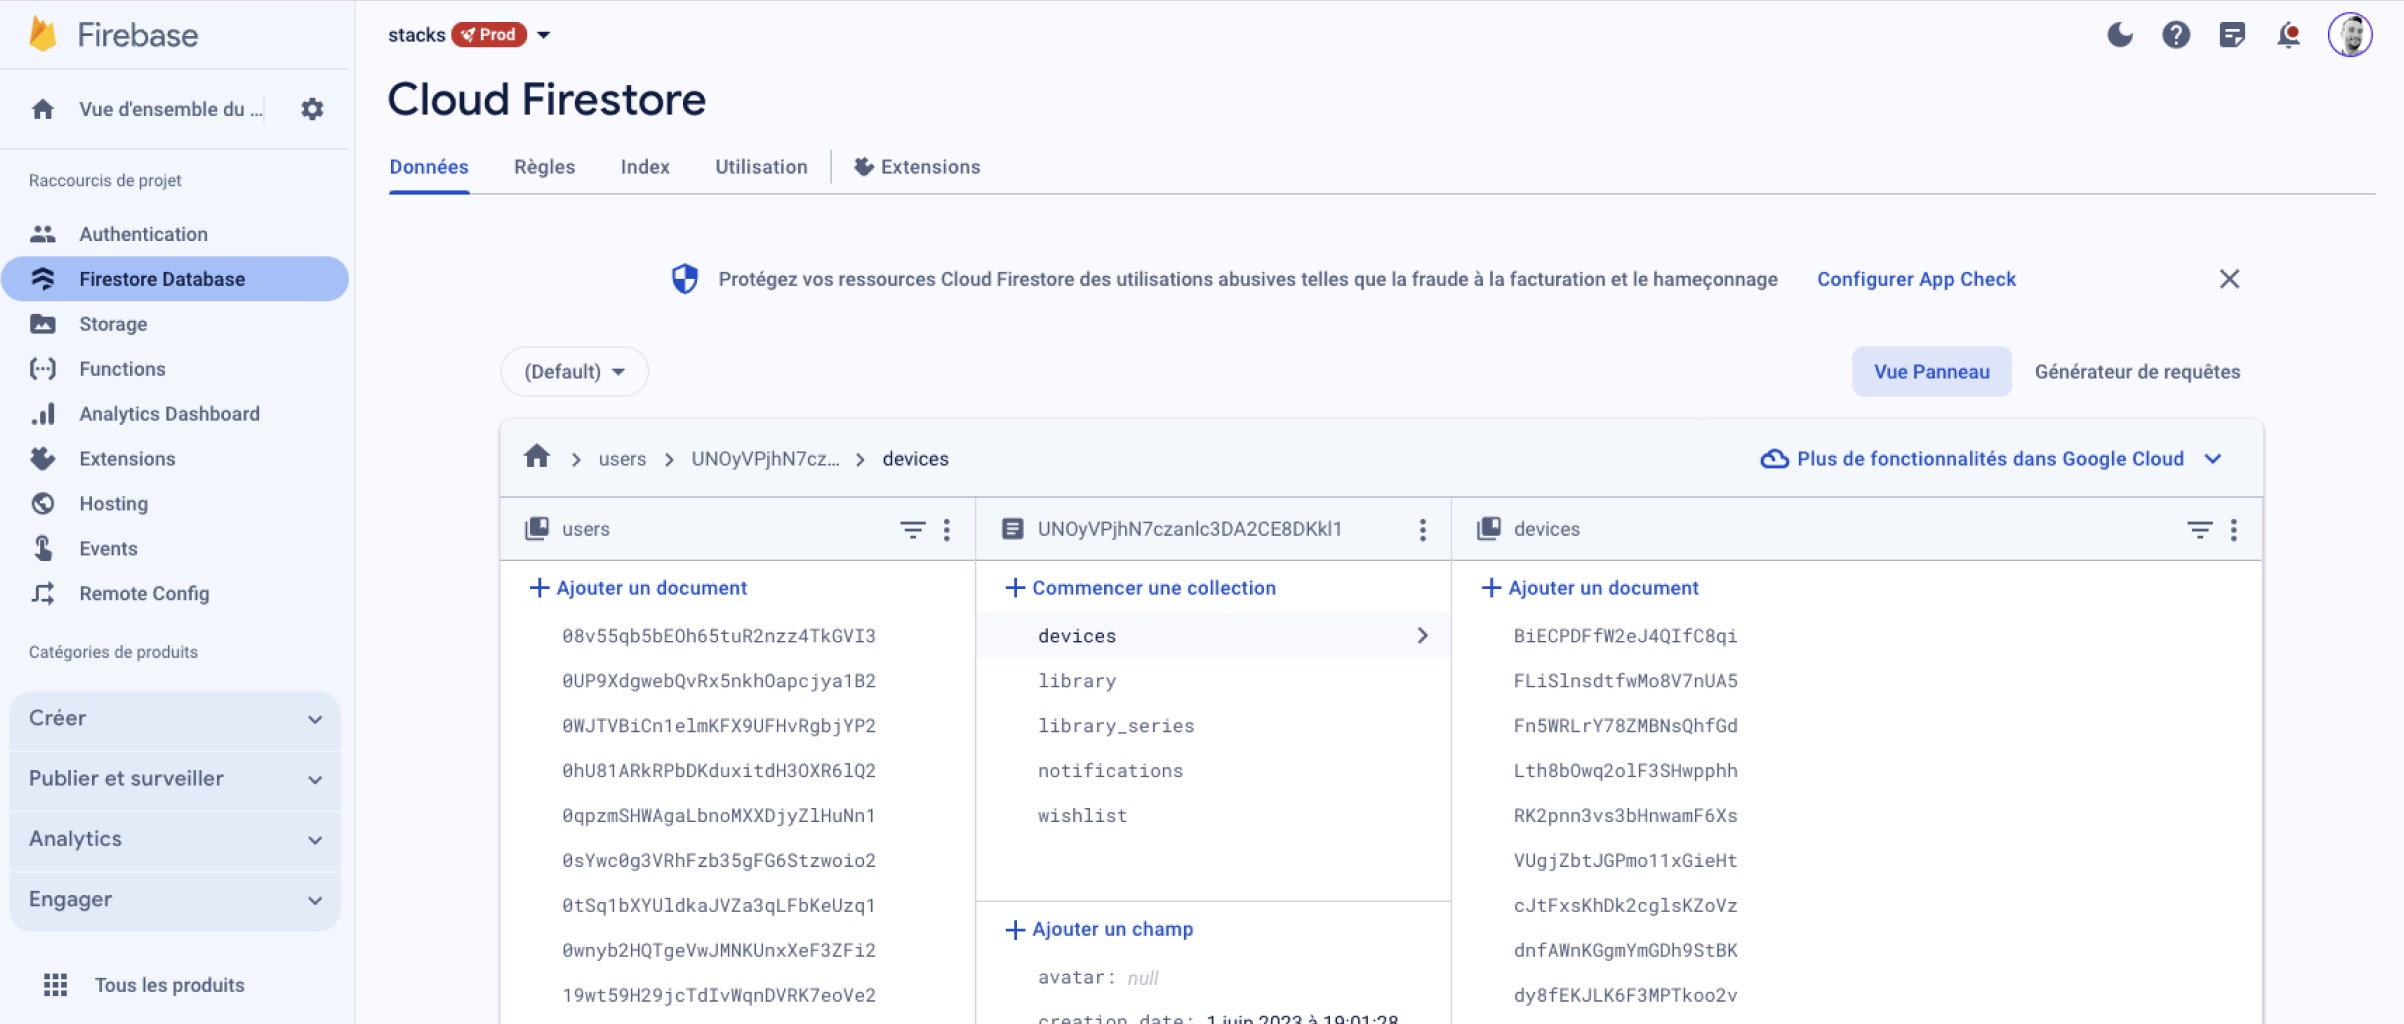
Firebase has to know your device and register it.

- we ask FCM notifications service to register our device
- FCM returns a unique registration token
- We now store it in firestore in user’s subcollection of devices
👉 Remember you have to store the token in your database to be able to send notifications to this device.
But keep in mind that this token can expire and firebase will ask to sometimes refresh it. You will then have to update it in your database.
Register multiple devices for one user
Most of us likes to use apps on multiple devices so you should probably consider allowing to store multiple tokens for each users. That's how we handle that in our apps when we use firestore.
To do that you will have to generate a unique ID for the device and store it in the shared preferences.
So that you can replace or remove the right token once the user logout.
Again if you use any other database, it's the same idea. Handle devices in a separate collection or table and store the tokens in it associated to a unique device id you generated on the device.
Note: You can't use the deviceId from the device as Apple and Google don't like it anymore.
Send a push notification to a device
Now we can send one or more notification to the devices and users we wants. Our device is registered and we have stored the token in our database, and our user has accepted notifications.
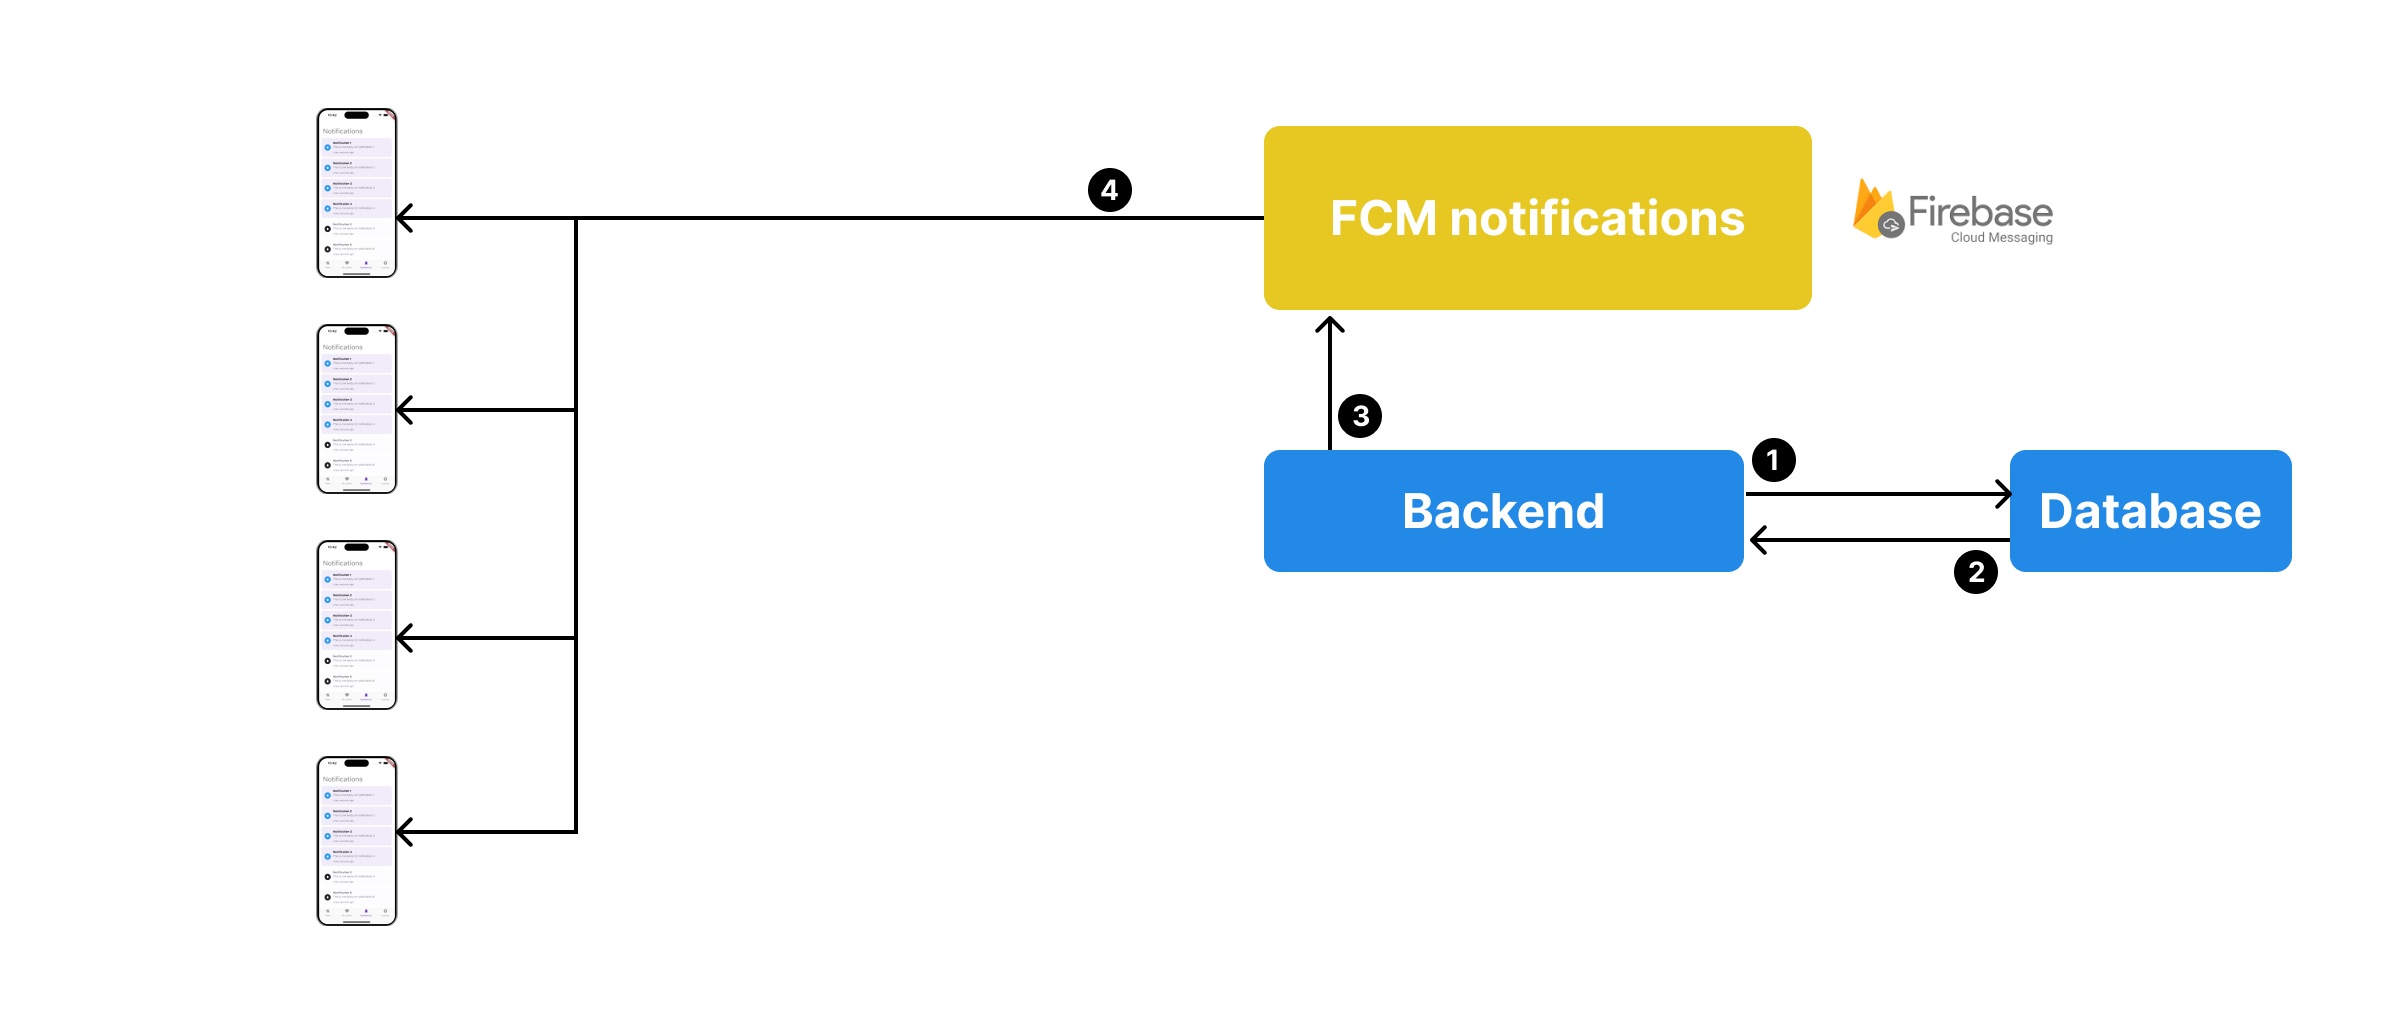
- We request each users tokens to our database
- Our database returns it
- We send a request with the tokens to the FCM notifications server
- FCM sends it to each devices according to their platform.
Note : there is some limitations on how many notifications you can send with each request. You can't send more than 500 tokens at once.
One of the wonderful things is that firebase cloud messaging works on every platform.
For iOS it will proxy a request to the Apple messaging server as Firebase is a google service.
But it's easy to configure, you will see.
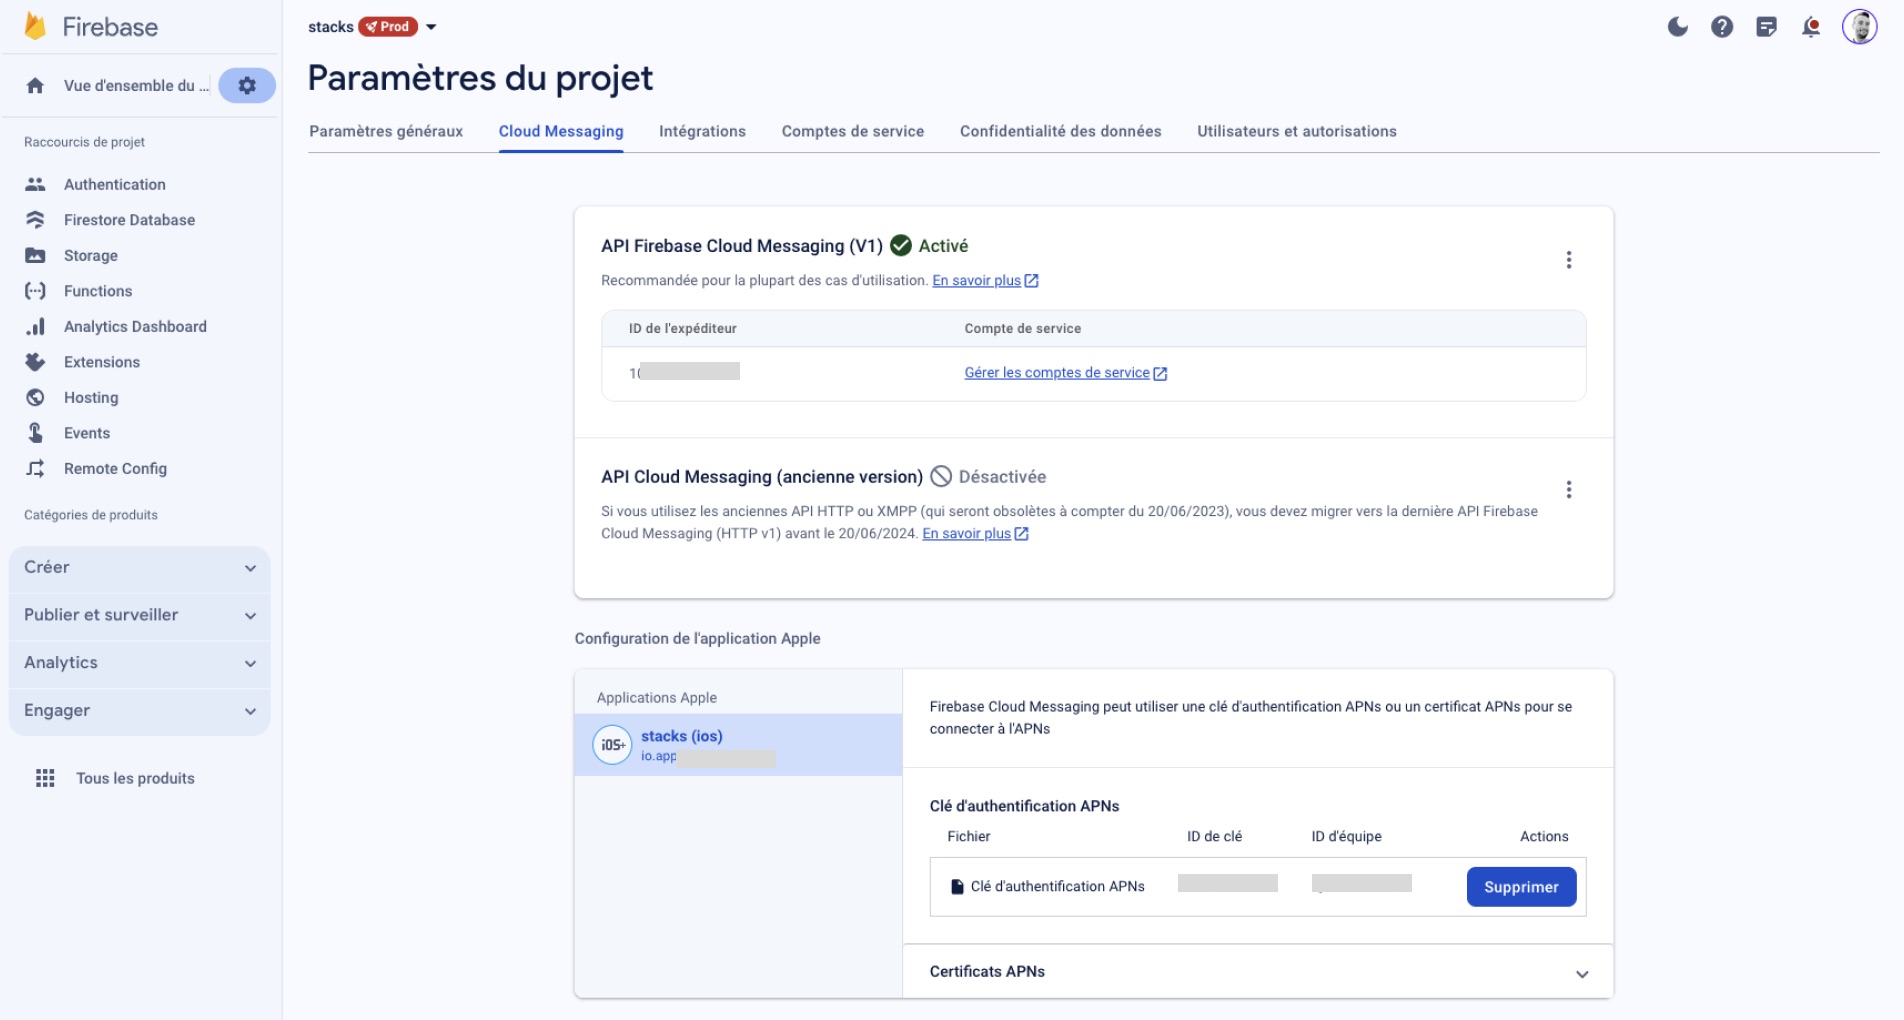
Configure Firebase Cloud Messaging for iOS
iOS requires you to upload a key to firebase to be able to send notifications to your users.
That key is called APNs Auth Key.
Note that you can’t have more than two keys and you can download it only once.
So keep this file in a safe place.
You can use the same key for all your apps.
If you don’t know how to do it.
Take a look at the notifications setup documentation of ApparenceKit.
Once you have your key, you can upload it to firebase in your project settings > cloud messaging.
How do we handle notifications in ApparenceKit?
So how do we do that?
Let’s take a look at the ApparenceKit code
As we said earlier the first thing to do is to register our device when app starts or the user logs in.
Future<void> register(String userId) async {
  final device = await _getFromPrefs();
  if (device != null) {
    return;
  }
  final newDevice = await _deviceApi.get();
  final response = await _deviceApi.register(userId, newDevice);
  await _saveInPrefs(response);
}
Inside the device_repository we have a register method.
We checks if our device already exists.
If true then we skip.
Else we retrieve a token from firebase. (that’s nearly what does _deviceApi get method do).
Then we save it in our user’s devices collection.
If you don't know how to store data in the shared preferences.
Here's how we do it in ApparenceKit.
import 'package:apparence_kit/core/shared_preferences/shared_preferences.dart';

Future<void> _saveInPrefs(DeviceEntity device) async {
  final json = device.toJsonForPrefs();
  final data = jsonEncode(json);
  await _prefs.setString(_devicePrefsKey, data);
}

Future<DeviceEntity?> _getFromPrefs() async {
  final deviceJson = _prefs.getString(_devicePrefsKey);
  if (deviceJson != null) {
    final deviceMap = jsonDecode(deviceJson) as Map<String, dynamic>;
    return DeviceEntity.fromPrefs(deviceMap);
  }
  return null;
}
We use the shared_preferences plugin to store data to our device.
We calls the register method each time we receive a user login event or app starts.
This way we are sure that our token is saved.
// open lib > core > states > user_state.dart

...
try {
    final _ = await _deviceRepository.register(userId);
  } catch (err) {
    _logger.e(err);
    _logger.e('''
      ❌ Your device seems not to be registered.
      Check that you correctly setup a device registration API
      see: `lib/modules/notifications/api/device_api.dart`
    ''');
  }
  _deviceRepository.onTokenUpdate(_onUpdateToken);
...
As we said earlier, the token can expire and firebase will ask to sometimes refresh it.
So we listen to token updates.
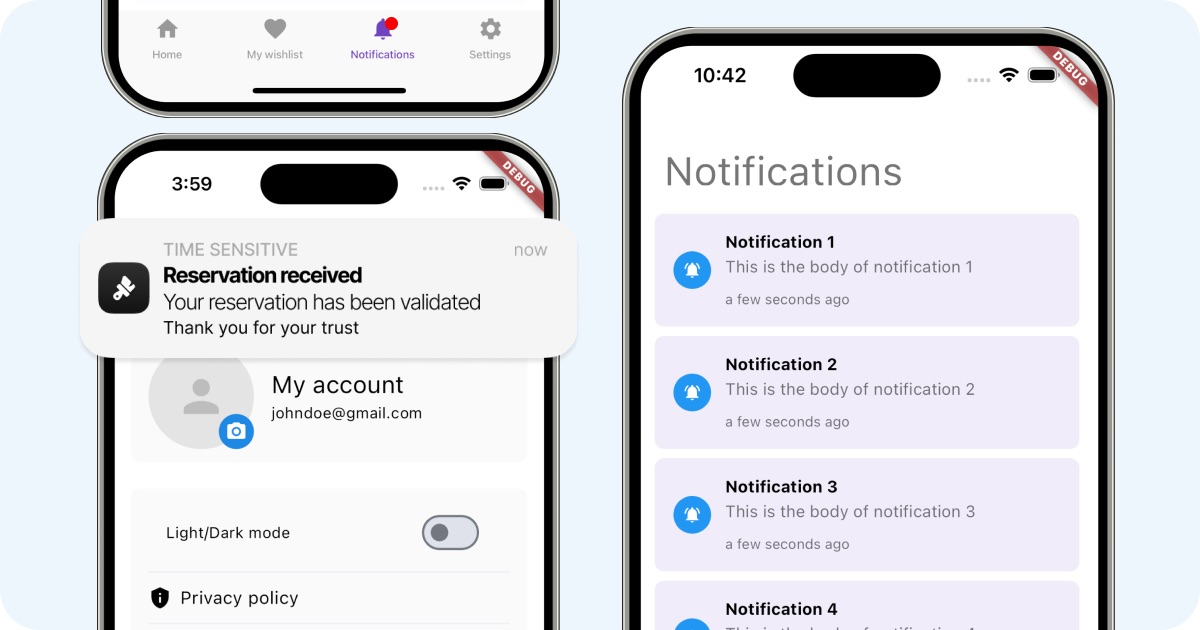
Show a local notification
Firebase plugin will automatically shows local notifications each time you receive a push notification.
Except when your app is in the foreground.
But you still need to init it every time your application starts.
There is 3 important methods
FirebaseMessaging.onMessage.listen(handler);

FirebaseMessaging.onBackgroundMessage(handler);

FirebaseMessaging.onMessageOpenedApp.listen(handler);
The first method will let you add a message handler that triggers once your app is in foreground and you receive a push notification.
The second method will let you add a message handler that triggers once your app is in background and you received a push notifications. By default firebase automatically shows a notifications so most of the time you don’t have to do anything here. But if you need to be careful to make your handler as a top level function (not within a class). Either it won’t work.
The last one will trigger once the user click on a notification. This is how we can redirect the user or any action you need from the push notification. See our tip on opening a web page on notification tap for a specific example. Remember you can use push notifications without showing any message to the user.
As I said we want to show a local notification message when the app is in foreground. So how do we do that?
Still in our notifications repository we have a method init
Future<void> init() async {
await _notificationsApi.requestPermission();
_notificationsApi.setForegroundHandler(_onMessage);
...
}
Future<void> _onMessage(RemoteMessage message) async {
final notification = Notification.from(
message.data,
notifierApi: _localNotifier,
notifierSettings: _notificationSettings,
);
_notificationPublisher.publish(notification);
}We creates our notification from the data and we gives it api and settings to shows notifications locally.
The Notification object will be then published to a queue that you can listen anywhere in your app to react according to notifications.
The publisher will automatically shows a local notification using the notification show method.
You can use it from anywhere in your app.
// lib > core > states > notification_dispatcher
/// use this if you want to listen to notifications anywhere in the app
ref.read(notificationSubscriberProvider);
// Use this when you want to publish a notification inside the app
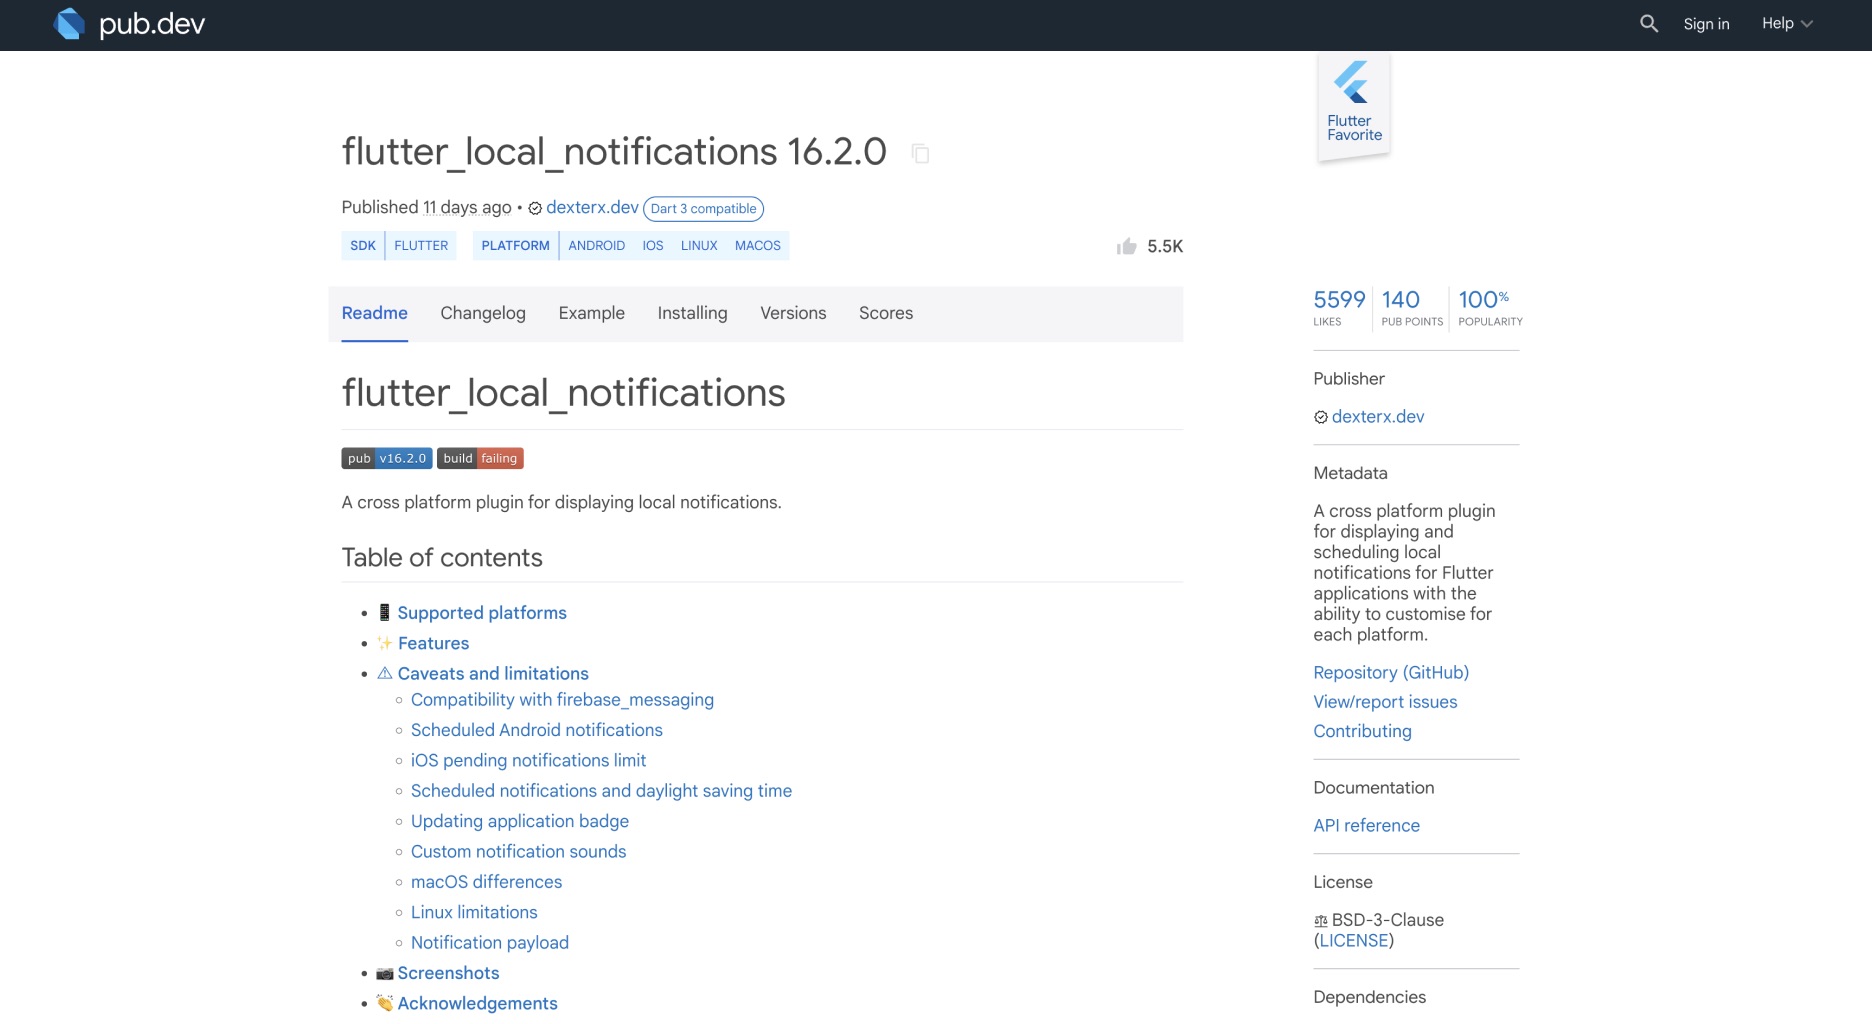
ref.read(notificationDipatcherProvider);Local notifications works using the amazing plugin flutter_local_notifications that you can find here. (Always support plugin and package maintainers by at least push the like button)
It requires a few setup that I won’t cover here.
You can check it directly on the documentation.
ApparenceKit has been all setup for you by default because I don’t think there much points on making an app without notifications.
As I like code to be simple.
You can call this within your app to directly show a notification without seeing how it works.
Notifications Settings are automatically using the default settings.
await notification.show();But you can override the settings. Here is the code.
Future<void> show({NotificationSettings? settings}) async {
    if (notifier == null) {
      throw Exception(
        'You must provide a LocalNotifierApi to show a notification',
      );
    }
    if (notifierSettings != null) {
      await notifier!.show(notifierSettings!, this);
      return;
    } else if (settings != null) {
      await notifier!.show(settings, this);
      return;
    }
    throw Exception(
      'You must provide a NotificationSettings to show a notification',
    );
  }
What are the notifications NotificationSettings?
NotificationSettings are the settings for each platforms.
Android requires channels, priority, etc...
You can also add images and sounds.
Receive notifications from topic
You can also subscribe to topics to receive notifications from them.
Using topic is a good way to send notifications to a group of users.
For example, you can send notifications to all your users to inform them of a new feature.
_notificationsApi.registerTopic('general');Conclusion
I hope that you now have a better understanding of how notifications works and how to handle them in Flutter with Firebase cloud messaging.
ApparenceKit boilerplate provides you everything to handle push and local notifications and even more so you don't have to waste time on implementing it.
- A system notification will shows when the app is in foreground
- A local notification will shows when the app is in background
- A counter will be updated on the app icon
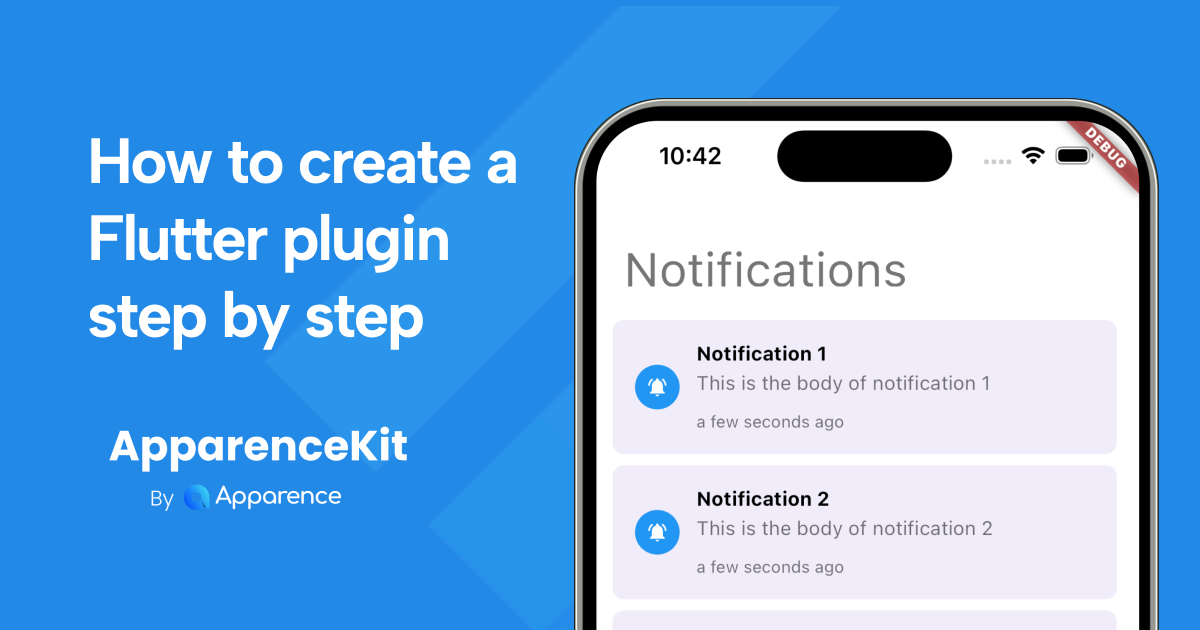
- A notification history page will be available to see all notifications
- Read status will be automatically updated 3s after the user check the notification page
- You can listen to push notifications everywhere in your app to react to them
But that's just a small part of the template.
Check the ApparenceKit page to see every other feature that has been made for you.