Changing things in a parent widget from a child can sometimes feel complicated in Flutter. The Actions and Intent system gives us a neat and organized way to handle this.
If you are not using any state management solution, you might find yourself passing callbacks down the widget tree. This can lead to a lot of boilerplate code and make your widget tree hard to follow. This is especially true when you have a deep widget tree and need to pass callbacks through multiple layers of widgets. It can become messy and hard to maintain. In this article, we will explore a pattern that uses Actions and Intents to simplify this process. This pattern allows you to define clear actions that can be triggered from anywhere in the widget tree, making your code cleaner and easier to understand.
We will only use the built-in Flutter widgets and classes, so you don't need to worry about any third-party libraries. This pattern is part of the Flutter framework itself and is designed to work seamlessly with it. I found this pattern inside the official Flutter source code.
The Solution: Actions and Intent
This pattern involves creating simple objects to describe what you want to do (the Intent) and classes that know how to do it (the Action).
Understanding Intent
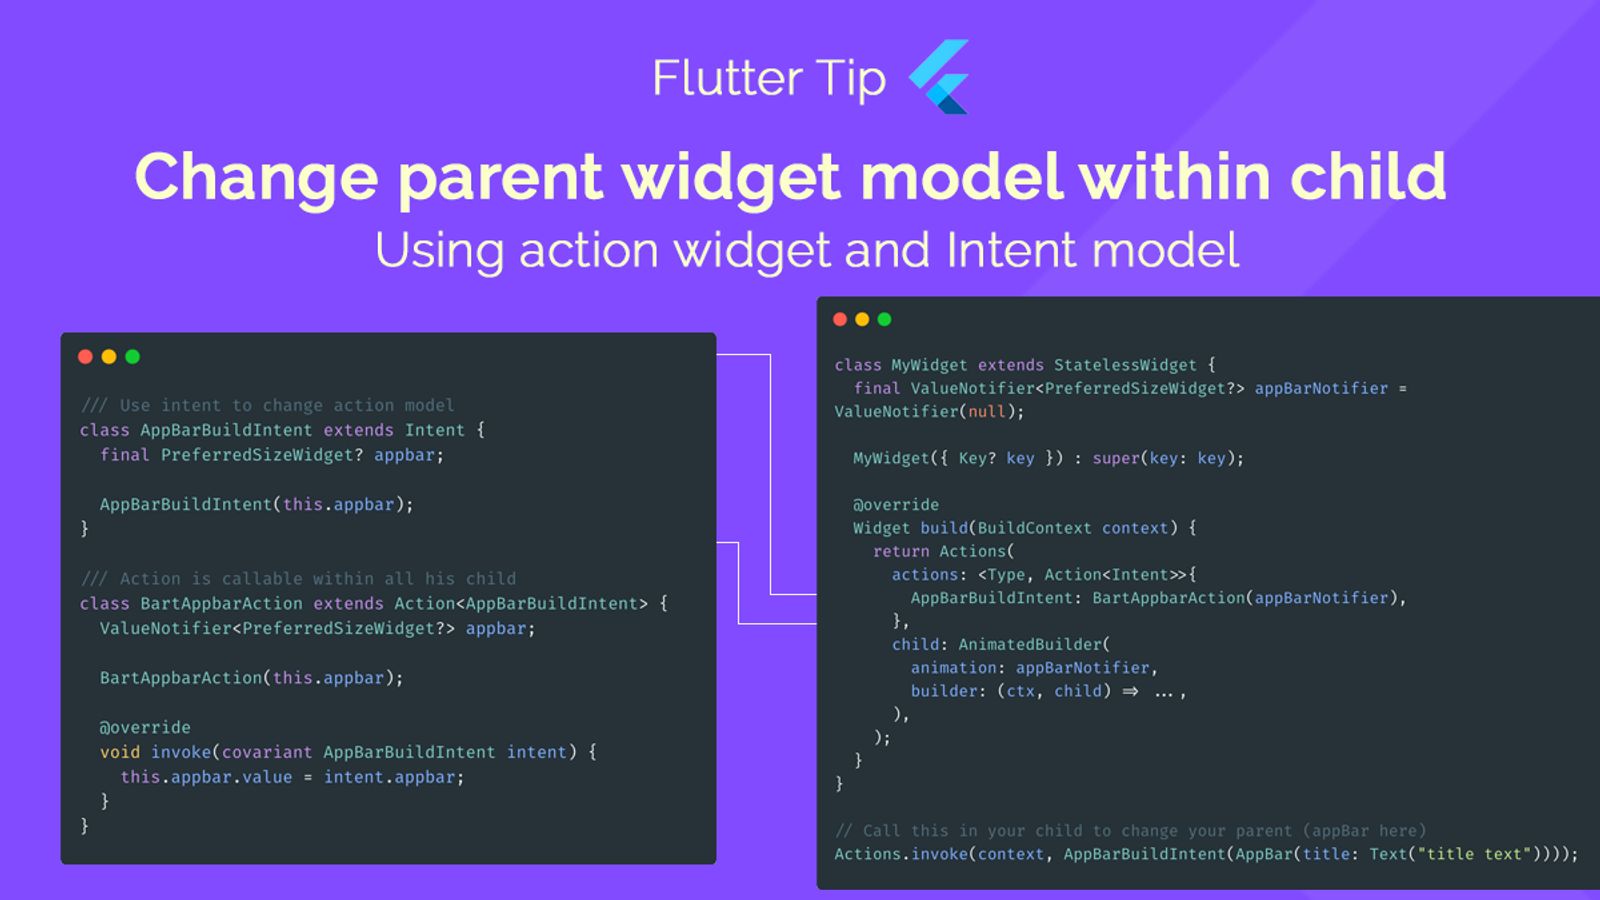
First, you define a simple class that extends Intent. Think of this as a message or a request. It holds the information you need to pass to the parent. In the example from the image, AppBarBuildIntent likely carries data related to building an AppBar.
Creating the Action
Next, you create a class that extends Action<YourIntentType>. This class is responsible for handling the specific Intent. It has an invoke method where you write the logic to perform the update on the parent's model or state. The example shows BartAppBarAction which updates a ValueNotifier using the data from the AppBarBuildIntent.
Setting up the Parent Widget
In the parent widget, you use the Actions widget. You wrap the part of your widget tree (including the child that will trigger the action) with Actions. You provide a map that links your Intent type to an instance of your Action class.
Calling the Action from the Child
From any child widget within the Actions scope, you can trigger the action. You simply call Actions.invoke(context, YourIntent(...)), passing a new instance of your Intent with the required data. Flutter finds the correct Action for that Intent and runs its invoke method.
Why use this approach?
Using Actions and Intents makes the communication flow from child to parent more explicit and testable. It provides a structured alternative to callbacks, especially when dealing with actions that might be triggered from various places deep within the widget tree.