You've built a sleek Flutter app with a nice form inside a bottom sheet using showModalBottomSheet.
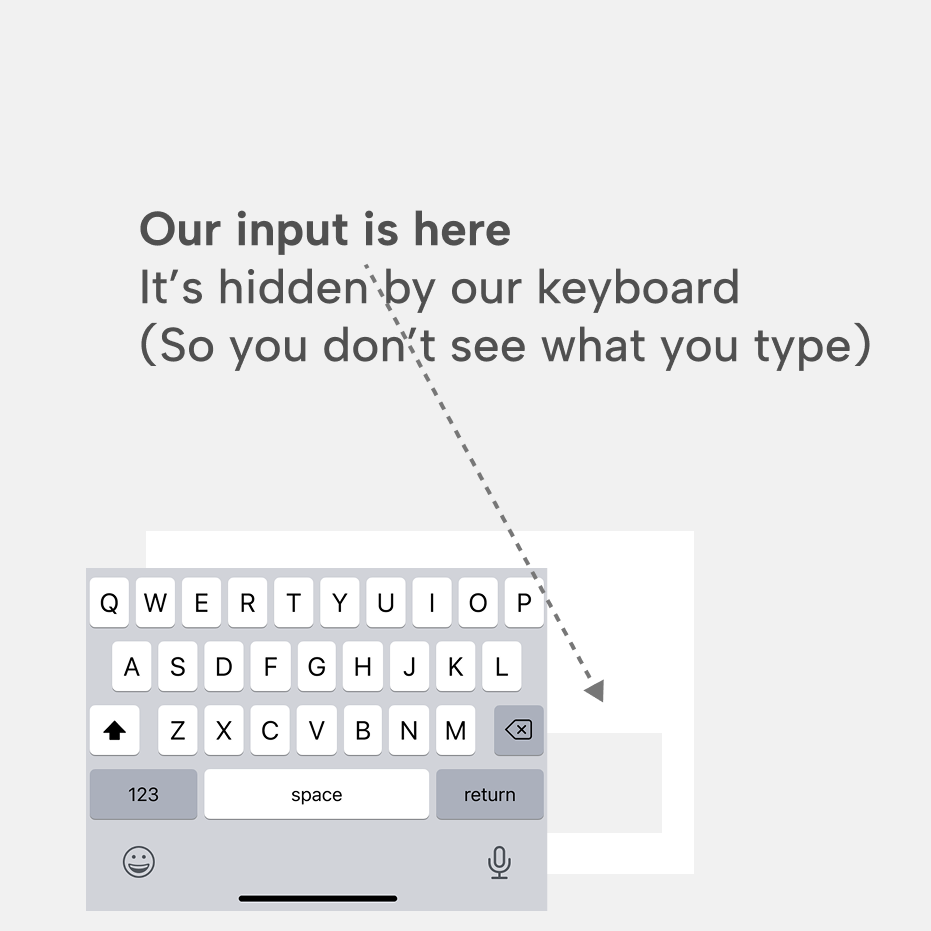
It looks great until you tap a TextField, the keyboard slides up, and...
The layout breaks, the input field gets hidden, and your users are left frustrated. Sound familiar?
This is a classic Flutter layout challenge, but the good news is it's entirely fixable with a few adjustments. This article will guide you through the three key changes needed to make your bottom sheets play nicely with the keyboard.
Why Does the Layout Break?
The issue stems from a combination of factors:
- Fixed Constraints: By default,
showModalBottomSheetoften takes up a portion of the screen (like half the height) and doesn't automatically resize when the keyboard appears. - Non-Scrollable Content: If the content within your bottom sheet isn't scrollable, there's nowhere for it to go when the keyboard drastically reduces the available vertical space.
- Keyboard Overlap: The keyboard essentially covers up the bottom part of the screen, including potentially your input fields, without the underlying layout inherently knowing how to adapt.
The 3-Step Solution
Based on the common approach demonstrated, here are the three changes to implement:
Step 1: Unconstrain the Bottom Sheet Size
The first step is to allow the bottom sheet to potentially grow taller than its default size. This is crucial because when the keyboard appears, you'll need the sheet to occupy the space above the keyboard.
How: In your showModalBottomSheet function call, set the isScrollControlled parameter to true.
showModalBottomSheet(
  context: context,
  // 👇 Allow the sheet to resize freely
  isScrollControlled: true,
  builder: (context) {
    return YourBottomSheetWidget();
  },
);
Setting isScrollControlled: true tells Flutter that the bottom sheet's height isn't fixed and can adapt to its content and surrounding constraints (like the keyboard).
Step 2: Make Your Content Scrollable
Now that the sheet can resize, you need to ensure the content within it can scroll if it overflows the available space. This is especially important when the keyboard significantly reduces that space. How: Wrap the main content of your bottom sheet (often a Column containing your form fields and other widgets) with a SingleChildScrollView.
Inside YourBottomSheetWidget's build method
Widget build(BuildContext context) {
return SingleChildScrollView( // 👈 Wrap content
child: Padding(
padding: const EdgeInsets.all(24.0), // Example padding
child: Column(
mainAxisSize: MainAxisSize.min, // Important for SingleChildScrollView
children: [
Text('Setup', style: Theme.of(context).textTheme.titleLarge),
SizedBox(height: 16),
TextField(
decoration: InputDecoration(labelText: 'Number'),
keyboardType: TextInputType.number,
),
// ... other widgets in your sheet
],
),
),
);
}SingleChildScrollView allows the user to scroll through the content if it doesn't fit vertically.
Step 3: Push Content Above the Keyboard (Add Bottom Space)
This is the magic step. Even with a resizable, scrollable sheet, the keyboard will still cover your content unless you explicitly add space at the bottom when the keyboard is visible.
Flutter provides a clean way to do this using MediaQuery and viewInsets. How: Add white space to the bottom of your scrollable content area. The amount of white space should dynamically match the height of whatever is obscuring the bottom of the screen (like the keyboard).
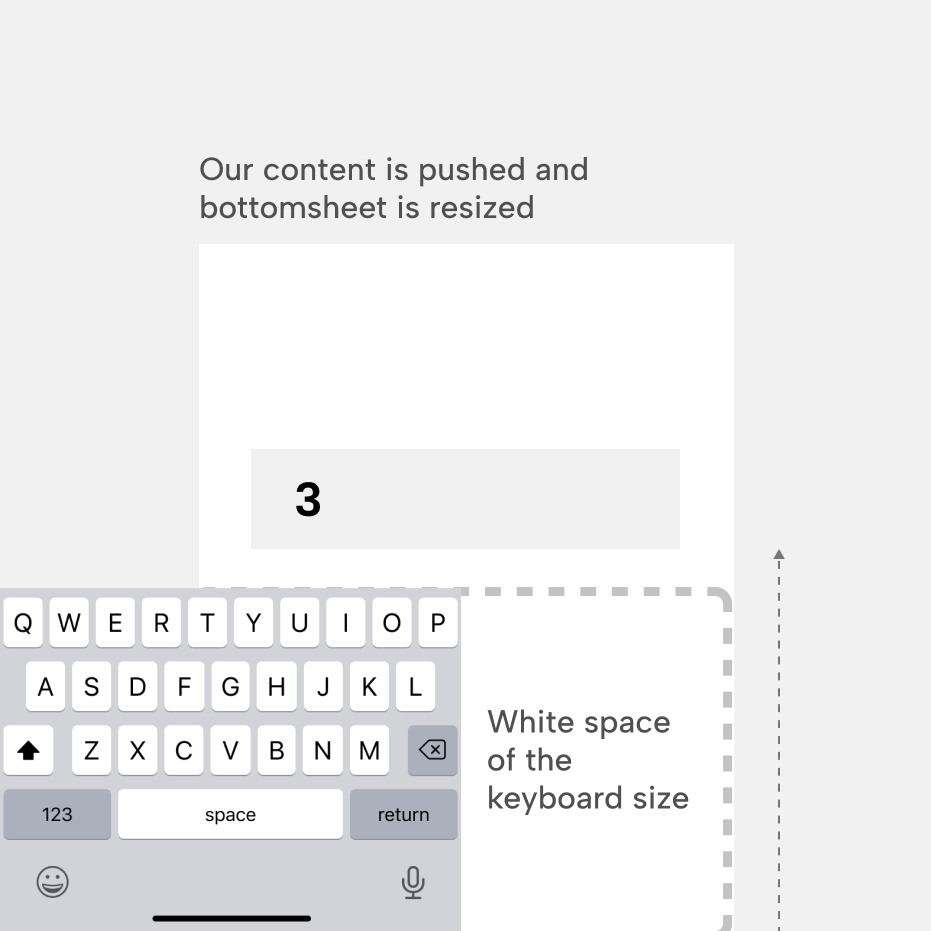
The MediaQuery.of(context).viewInsets.bottom property gives you exactly this height. It's zero when the keyboard is hidden and non-zero when it's visible. A SafeArea widget is often a convenient way to apply this.
Inside YourBottomSheetWidget's build method
Widget build(BuildContext context) {
return SafeArea( // Use SafeArea to handle system intrusions
minimum: EdgeInsets.only(
bottom: MediaQuery.of(context).viewInsets.bottom + 24, // 👈 Calculate white space based on keyboard visibility + optional extra space
),
child: Padding( // Apply padding, especially dynamic bottom padding
padding: EdgeInsets.all(...),
child: SingleChildScrollView(
child: Column(
mainAxisSize: MainAxisSize.min,
children: [
Text('Setup', ...),
SizedBox(height: 16),
TextField(
decoration: InputDecoration(labelText: 'Number'),
keyboardType: TextInputType.number,
),
// ... other widgets
],
),
),
),
);
}This ensures that when the keyboard appears, the bottom sheet's content is pushed up, and the input fields are visible.
Conclusion
By following these three steps, you can ensure that your bottom sheet behaves correctly when the keyboard appears. I believe this should be the default behavior of the bottom sheet, but for now, this is the best way to handle it. If you have any questions or need further assistance, feel free to reach out.
Happy coding!