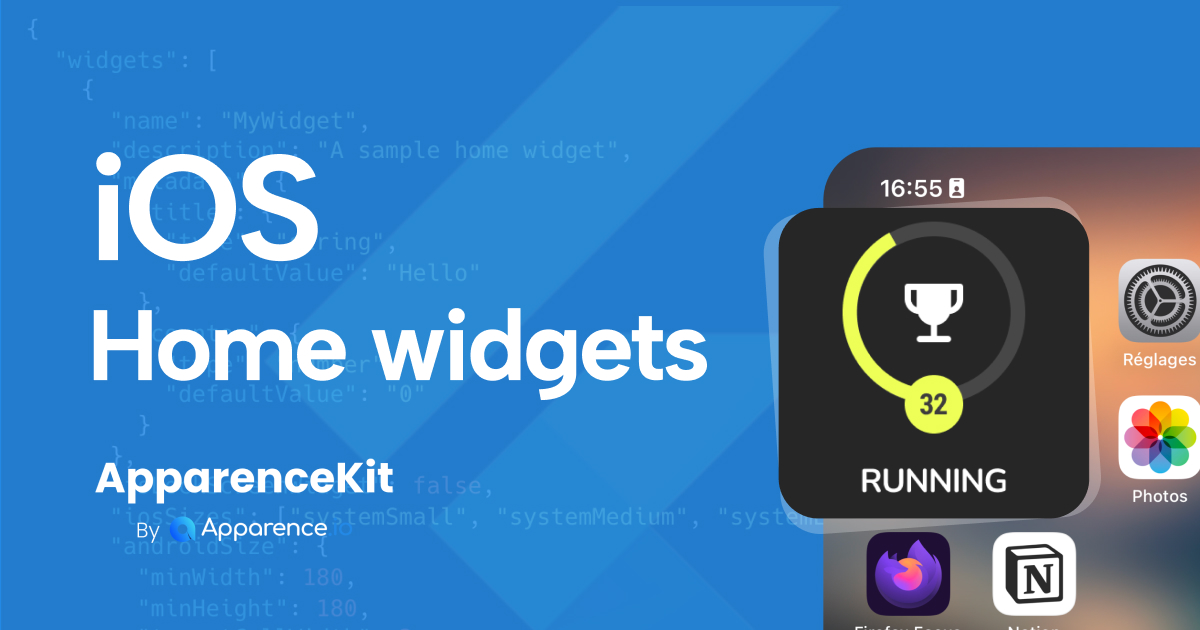
If you have ever tried to add those beautiful, interactive panels to your user's iPhone home screen using Flutter, you likely hit a wall. You expect to write Dart code and have it magically appear as a widget, just like the rest of your app.
But there is a problem with flutter home widgets.
"They don't run like normal apps. They run on a tiny little thread with strict memory limits. So small that Flutter can't run there."
So, how do we solve this? The answer lies in a hybrid approach: we render the UI using SwiftUI (native iOS) but keep using Flutter to fetch and manage the data.
In this guide, we will walk through the entire process—from the manual configuration in Xcode to automating the entire workflow with the ApparenceKit CLI.
Key Takeaways
- Flutter cannot run directly inside a Widget Extension due to memory constraints; you must use SwiftUI for the UI.
- App Groups are essential: They allow your main Flutter app and the Widget Extension to share data via
UserDefaults. - Xcode Configuration is tricky: You need to manually adjust Build Phases (specifically the "Thin Binary" script) to avoid build errors.
- Automation saves time: The ApparenceKit CLI can generate the Swift code, Dart services, and Xcode config from a single JSON file.
Understanding the Architecture
Before writing code, it is crucial to understand where your code lives. Your Flutter app runs in its own process. The Home Widget runs in a completely separate process (the Widget Extension).
Because they are separate, they cannot share memory variables. You cannot just pass a Dart object to the Widget. instead, we use a shared storage container called App Groups.
- Flutter App: Fetches data (API, Database) → Saves it to
UserDefaultsvia App Groups. - Widget Extension: Wakes up → Reads
UserDefaults→ Renders the UI with SwiftUI.
Part 1: The Manual Setup (Xcode Configuration)
If you are setting this up from scratch, get ready to spend some time in Xcode. Here is the step-by-step process.
1. Create the Widget Target
Open your project in Xcode (ios/Runner.xcworkspace).
- Go to File > New > Target.
- Search for "Widget Extension".
- Name it (e.g.,
HomeWidget). - Important: Do not check "Include Live Activity" or "Configuration App Intent" for this basic tutorial.
2. Fix the "Thin Binary" Build Error
This is a common "gotcha" for Flutter developers. When you try to run the app after adding a target, it will often fail with a build error.
- Why? The Flutter build script interferes with the extension build process.
- The Fix: Go to your Runner Target > Build Phases. Find the script named "Thin Binary" and drag it to the very bottom of the list.
3. Enable App Groups
This is the bridge between your app and the widget.
- Select your Runner target > Signing & Capabilities.
- Click + Capability and add App Groups.
- Create a new group ID. The convention is usually
group.your.bundle.identifier(e.g.,group.io.apparence.my_app). - Repeat this step for the Widget Extension target. Both targets must have the exact same App Group enabled.
"If you don't prefix the App Group with the same identifier of your app, it won't work."
Part 2: The Flutter Implementation
Now that the native side is ready, we need to communicate from Dart. We will use the home_widget package.
1. Configure the App Group in Dart
In your main.dart or initialization logic, tell the plugin which group to use.
import 'package:home_widget/home_widget.dart';

void main() async {
  WidgetsFlutterBinding.ensureInitialized();

  // Set the group ID you created in Xcode
  await HomeWidget.setAppGroupId('group.io.apparence.my_app');

  runApp(MyApp());
}
Notes :
- replace
'group.io.apparence.my_app'with your actual App Group ID. This is critical for data sharing. - Make sure that your group id is prefixed with
group.and the rest matches your app's bundle identifier.
2. Saving Data to the Widget
Let's say you want to display a weather temperature or a counter. You save the data using key-value pairs.
Future<void> updateWeatherWidget(int temperature, String condition) async {
  // Save data to the shared container
  await HomeWidget.saveWidgetData<String>('temperature', temperature.toString());
  await HomeWidget.saveWidgetData<String>('condition', condition);

  // Notify iOS to refresh the widget UI
  // 'WeatherWidget' must match the kind/name used in your Swift code
  await HomeWidget.updateWidget(
    name: 'WeatherWidget',
    iOSName: 'WeatherWidget',
  );
}
Part 3: The SwiftUI Implementation
Now we move to the Swift file created in your extension folder (e.g., HomeWidget.swift).
By default, Apple gives you a timeline provider. You need to modify it to read from the UserDefaults suite we just populated.
struct WeatherEntry: TimelineEntry {
    let date: Date
    let temperature: String
    let condition: String
}

func getTimeline(...) {
    // Access the shared App Group
    let prefs = UserDefaults(suiteName: "group.io.apparence.my_app")

    // Read the data sent from Flutter
    let temp = prefs?.string(forKey: "temperature") ?? "0"
    let cond = prefs?.string(forKey: "condition") ?? "Sunny"

    let entry = WeatherEntry(date: Date(), temperature: temp, condition: cond)

    // Create the timeline (update immediately)
    let timeline = Timeline(entries: [entry], policy: .atEnd)
    completion(timeline)
}
Once the data is retrieved, you use standard SwiftUI Text() or Image() views to display it.
Part 4: Automating the Pain with ApparenceKit CLI
If the manual process above felt tedious—creating targets, managing bundle IDs, syncing strings between Dart and Swift—you are not alone. It is error-prone and slow.
This is why I added a dedicated automation tool to ApparenceKit. You can generate your entire flutter home widget setup from a single JSON file.
1. Create the Config File
Create a file named home_widget_config.json in your project root.
{
  "widgets": [
    {
      "name": "Weather",
      "description": "Shows current temperature",
      "iosSizes": ["systemSmall", "systemMedium"],
      "metadata": {
        "temperature": {
          "type": "string",
          "default": "20"
        },
        "condition": {
          "type": "string",
          "default": "Sunny"
        }
      }
    }
  ]
}
2. Run the Generator
Run the following command in your terminal:
dart run apparence_cli widgetThis command automatically:
- Creates the Swift UI code with the correct TimelineProvider.
- Generates a Dart service (
HomeWidgetWeatherService) to easily update data. - Handles the Xcode target creation and App Group association.
3. Use the Generated Service
Now, updating your widget in Flutter becomes incredibly simple:
// The CLI generated this service for you
final weatherService = HomeWidgetWeatherService();

await weatherService.update(
  temperature: "24°C",
  condition: "Cloudy",
);
You no longer have to worry about typos in key strings or App Group IDs.
Designing with AI
If you are a Flutter developer, you might not be an expert in SwiftUI. That is okay.
Since the CLI generates the basic structure, you can copy the generated WeatherWidgetView struct into an AI tool like Claude or ChatGPT and ask:
"Here is my SwiftUI widget code. Can you redesign it to look like a modern weather card with a gradient background and SF Symbols?"
Paste the result back into your project, and you have a professional-looking widget without learning the intricacies of SwiftUI layout systems.
Conclusion
Creating flutter home widgets on iOS requires breaking out of the Flutter sandbox. You have to embrace the native platform constraints by using SwiftUI for rendering and App Groups for data transfer.
While you can do this manually, configuring Xcode targets and ensuring both sides speak the same language can be frustrating. Using the ApparenceKit CLI transforms this from a multi-hour task into a 5-minute job.
If you want to build scalable Flutter apps faster, check out ApparenceKit—the Flutter Starter Kit designed to save you months of development time.
You can also watch the full Youtube video tutorial here