If most of the Flutter apps are for mobile iOS and Android devices. We still needs to create sidebar for tablets. And as you know you can also publish your Flutter app on the web.
In this article, we will see how to create a sidebar menu in Flutter. We will use the Go Router package to manage the navigation and the nested navigation to display the content of the sidebar menu.
1. Create the sidebar menu
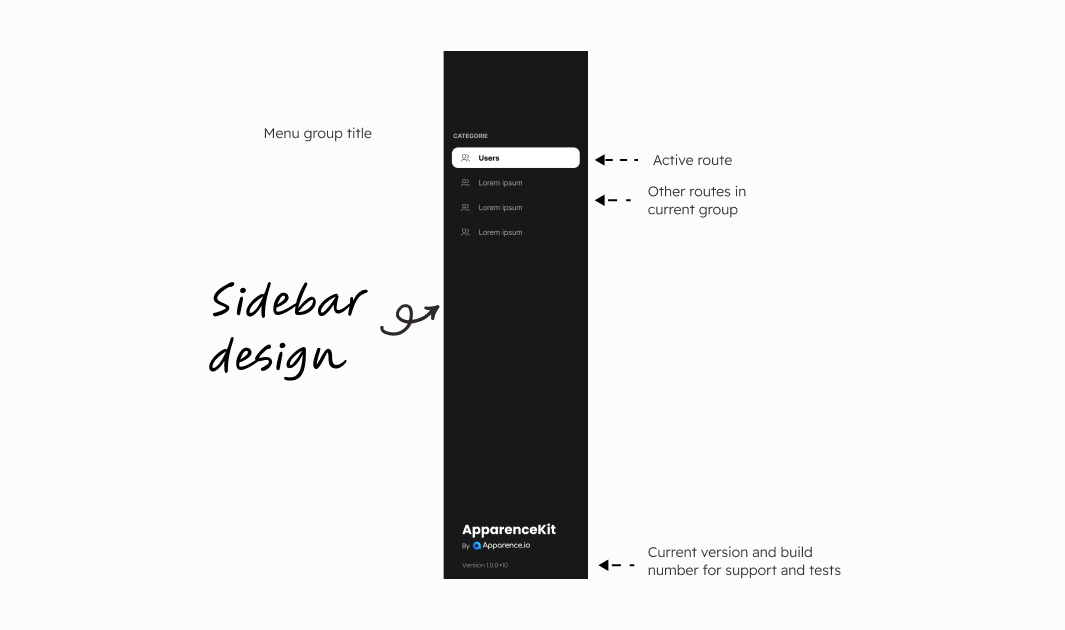
First, we will create the sidebar menu. It will look like this:

The Sidebar container
Let's start by creating the Sidebar global widget. For now this will only be a container with a fixed width, a background color and a Column widget to display the menu items.
class SideBar extends StatelessWidget {
const SideBar({
super.key,
});
Widget build(BuildContext context) {
return LayoutBuilder(
builder: (context, constraints) {
return Container(
width: 280,
height: constraints.maxHeight,
decoration: BoxDecoration(
color: context.colors.onBackground,
border: Border(
right: BorderSide(
color: context.colors.onBackground.withOpacityCpy(.05),
),
),
),
child: Column(
crossAxisAlignment: CrossAxisAlignment.stretch,
children: [
// This will be the content of the sidebar menu
],
),
);
}
);
}
}Noticed that we used a LayoutBuilder instead of MediaQuery.of(context).size.height to get the maximum height available.
For performance reasons, it is better to use LayoutBuilder.
The Sidebar menu category
If you look at the design, you will see that the sidebar menu is divided into categories. Each category has a title and a list of items. So we will create a widget to represent a category and it's items will be a list of widgets.
class SideBarCategory extends StatelessWidget {
final String? category;
final List<Widget> items;
const SideBarCategory({
super.key,
this.category,
required this.items,
});
Widget build(BuildContext context) {
return Padding(
padding: const EdgeInsets.only(top: 16),
child: Column(
crossAxisAlignment: CrossAxisAlignment.stretch,
children: [
if (category != null)
Padding(
padding: const EdgeInsets.symmetric(vertical: 10, horizontal: 24),
child: Text(
category!.toUpperCase(),
style: context.textTheme.bodySmall?.copyWith(
color: const Color(0xFF666666),
fontSize: 11,
fontWeight: FontWeight.bold,
),
),
),
...items,
],
),
);
}
}As this widget is pretty simple we won't explain it in details.
Possible improvements
- don't use a color directly, use a color from the theme
- use a TextStyle from the theme
The Sidebar menu item
This start to be interesting.
Now we will create a widget to represent a menu item.
It will have:
- an icon
- a title
- a callback to execute when the item is clicked
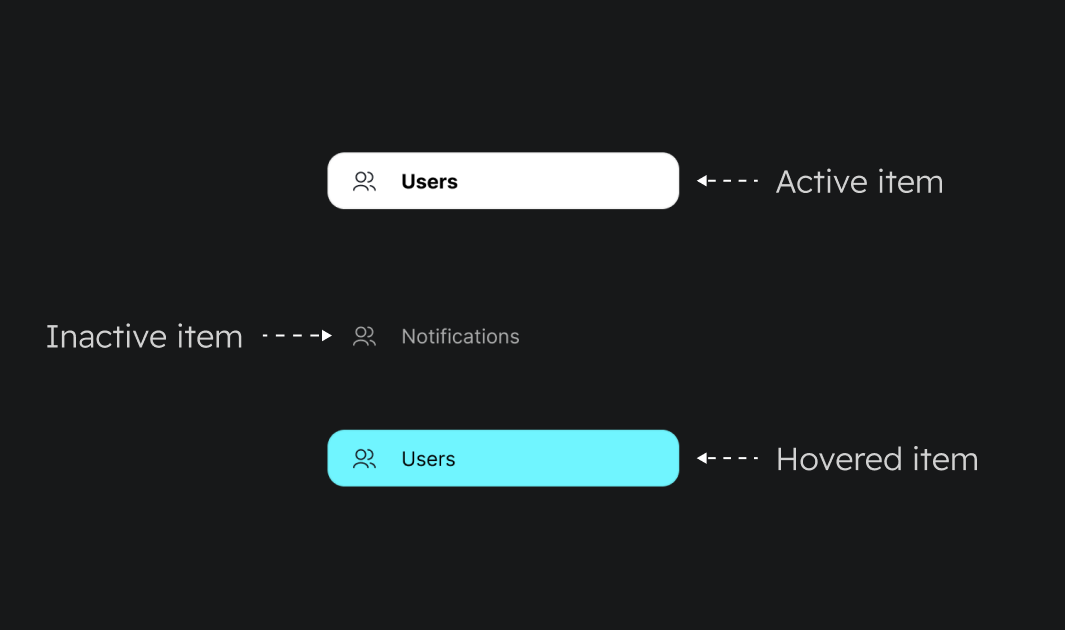
- a status to know if the item is selected, hovered or inactive

The code:
class SideBarCategoryItem2 extends StatefulWidget {
final String title;
final VoidCallback onTap;
final IconData icon;
final SidebarItemStatus status;
const SideBarCategoryItem2({
super.key,
required this.title,
required this.icon,
required this.status,
required this.onTap,
});
State<SideBarCategoryItem2> createState() => _SideBarCategoryItemState2();
}
class _SideBarCategoryItemState2 extends State<SideBarCategoryItem2> {
late SidebarItemStatus _status;
void initState() {
super.initState();
_status = widget.status;
}
Widget build(BuildContext context) {
return Material(
color: Colors.transparent,
child: Padding(
padding: const EdgeInsets.symmetric(horizontal: 16.0),
child: InkWell(
onTap: widget.onTap,
onHover: (value) {
setState(() {
if (value) {
_status = SidebarItemStatus.hovered;
} else {
_status = widget.status;
}
});
},
borderRadius: BorderRadius.circular(12),
child: Ink(
height: 40,
padding: const EdgeInsets.symmetric(
vertical: 6,
horizontal: 12,
),
decoration: BoxDecoration(
color: switch (_status) {
SidebarItemStatus.active => context.colors.background, // white
SidebarItemStatus.hovered => context.colors.primary.withOpacityCpy(.3),
SidebarItemStatus.inactive => Colors.transparent,
},
borderRadius: BorderRadius.circular(12),
),
child: Row(
children: [
Padding(
padding: const EdgeInsets.only(right: 12.0),
child: SidebarItemIcon(
icon: widget.icon,
color: switch (_status) {
SidebarItemStatus.active => context.colors.onBackground, // black
SidebarItemStatus.hovered => context.colors.onBackground, // black
SidebarItemStatus.inactive => context.colors.background.withOpacityCpy(.8), // grey
},
),
),
Expanded(
child: Text(
widget.title,
maxLines: 1, // we want to show only one line
overflow: TextOverflow.ellipsis, // if the text is too long, it will be ellipsed
style: context.textTheme.bodyMedium?.copyWith(
color: switch (_status) {
SidebarItemStatus.active => context.colors.onBackground, // black
SidebarItemStatus.hovered => context.colors.onBackground, // black
SidebarItemStatus.inactive => context.colors.background.withOpacityCpy(.8), // grey
},
fontWeight: switch (_status) {
SidebarItemStatus.active => FontWeight.w600, // semi - bold
_ => FontWeight.w300, // light when hovered or inactive
},
),
),
),
],
),
),
),
),
);
}
}Our item is a StatefulWidget because we need to manage the status of the item. We use a Material widget to have the InkWell widget to manage the onTap and onHover events.
The InkWell widget is a Material widget that allows us to have a ripple effect when the user clicks on the item (and of course track user interactions).
The InkWell so has a "onHover" callback that will be called when the user hovers the item. (only for web)
...
onHover: (value) {
    setState(() {
        if (value) {
        _status = SidebarItemStatus.hovered;
        } else {
        _status = widget.status;
        }
    });
},
...
Each time the user hovers the item, we update the status of the item to hovered. If the user stops hovering the item, we reset the status to the initial status.
The item has a background color that depends on the status of the item.
we can now add the items into the Sidebar widget
class SideBar extends StatelessWidget {

  ...
          child: Column(
            crossAxisAlignment: CrossAxisAlignment.stretch,
            children: [
              // lets add the items
              SideBarCategoryItem(
                icon: Icons.people_outline,
                title: 'Users',
                status: , // we don't have this yet
                onTap: () {
                  // we need to implement this
                },
              ),
              SideBarCategoryItem(
                icon: Icons.notifications,
                title: 'Notifications',
                status: , // we don't have this yet
                onTap: () {
                  // we need to implement this
                },
              ),
              ...
            ],
          ),
        );
      }
    );
  }
}
2. Handling the navigation with Go Router
Now that we have our sidebar menu, we need to handle the navigation. We will use the Go Router package to manage the navigation as it is currently the most popular package for navigation in Flutter.
The Router file
As we will use the Go Router package, we need to create a file to manage the routes.
But instead of adding directly all routes (GoRoute) we will wrap them into sub navigation.
We will wrap all sub navigation routes into a StatefulShellRoute to manage the state of the sub navigation. For each sub routes we will have StatefulShellBranch that can contains multiple routes.
yes this is a bit complex but it will allow us to have a better control of the navigation. Every items will have it's own navigation stack.
You can see the structure like this:
-- GoRoute
-- GoRoute
-- GoRoute
-- StatefulShellRoute
---- StatefulShellBranch
------ GoRoute
------ GoRoute
---- StatefulShellBranch
------ GoRoute
------ GoRoute
import 'package:go_router/go_router.dart';


GoRouter generateRouter() {
    return GoRouter(
        routes: [
            // page without sidebar
            GoRoute(
                name: 'signin',
                path: '/signin',
                builder: (context, state) => const SigninPage(),
            ),
            // page with sidebar
            StatefulShellRoute(
                parentNavigatorKey: navigatorKey,
                // the sidebar will be displayed on the left
                // prefer wrap this into a widget
                builder: (context, state, navigationShell) => Row(
                    children: [
                        SideBar(state: state),
                        Expanded(child: navigationShell),
                    ],
                );
                // the builder will be called when the route is activated
                // the navigationShell is a widget that will display the content of the route
                // it will show the current latest page of the navigation stack for each branch
                navigatorContainerBuilder: (
                    BuildContext context,
                    StatefulNavigationShell navigationShell,
                    List<Widget> children,
                ) {
                    if(children.isEmpty) {
                        return SizedBox();
                    }
                    return Scaffold(
                        body: children[navigationShell.currentIndex],
                    );
                },
                branches: [
                StatefulShellBranch(
                    routes: [
                    GoRoute(
                        name: 'users',
                        path: '/users',
                        builder: (context, state) => const AuthenticatedGuard(
                        fallbackRoute: '/signin',
                        child: UsersPage(),
                        ),
                    ),
                    GoRoute(
                        name: 'user profile',
                        path: '/users/:userId',
                        builder: (context, state) =>  AuthenticatedGuard(
                        fallbackRoute: '/signin',
                        child: UserProfilePage(userId: state.pathParameters['userId']!),
                        ),
                    ),
                    ],
                ),
                StatefulShellBranch(
                    routes: [
                        GoRoute(
                            name: 'notifications',
                            path: '/notifications',
                            builder: (context, state) => const AuthenticatedGuard(
                            fallbackRoute: '/signin',
                            child: PageFake(),
                            ),
                        ),
                        ],
                    ),
                ],
            ),
        ]
    );
}
👉 The navigationShell is a widget that will display the content of the route It will show the current latest page of the navigation stack for each branch.
You may have noticed that we have passed the current GoRouter state to the Sidebar widget. This will allow us to know which item is selected and to update the status of the item accordingly.
The Sidebar item status
We can now update our Sidebar item to manage the status of the item.
class SideBar extends StatelessWidget {
   final GoRouterState state; // <-- we add this

    const SideBar({
        super.key,
        required this.state, // <-- we add this
    });

    bool isRouteActive(String route) {
        return state.matchedLocation.startsWith(route);
    }

  ...
          child: Column(
            crossAxisAlignment: CrossAxisAlignment.stretch,
            children: [
              ...
              SideBarCategoryItem(
                icon: Icons.notifications,
                title: 'Notifications',
                status: isRouteActive('/notifications')
                    ? SidebarItemStatus.active
                    : SidebarItemStatus.inactive,
                onTap: () {
                  // we need to implement this
                },
              ),
              ...
            ],
          ),
        );
      }
    );
  }
}
Note that we do state.matchedLocation.startsWith(route); instead of state.matchedLocation == route;
This is because the route can be a nested route and we want to know if the current route is a child of the route we are checking.
Navigate to a route
Now we need to implement the onTap callback of the Sidebar item to navigate to the route.
Like any GoRoute we can use the context.go('/route') method to navigate to a route.
Here is the full code of the Sidebar item:
SideBarCategoryItem(
    icon: Icons.notifications,
    title: 'Notifications',
    status: isRouteActive('/notifications')
        ? SidebarItemStatus.active
        : SidebarItemStatus.inactive,
    onTap: () {
        context.go('/notifications');
    },
),
Conclusion
In this article, we have seen how to create a sidebar menu in Flutter. We have used the Go Router package to manage the navigation and the nested navigation to display the content of the sidebar menu.
We have also seen how to update the status of the Sidebar item according to the current route.
You can now have a sidebar menu in your Flutter app that will work on tablet and web.


