Setup ApparenceKit with Firebase
Prerequisites
You must have installed
1 - Generate your app
Now ApparenceKit CLI installed,
you can run the setup command to setup the template with your needs.
Open a terminal and run the following command in the root of your project:
apparence_cli setup . You will be asked to choose between using Firebase or Supabase or Http Client.
Choose Firebase then press enter.
You will also be asked about
- Using Sentry for error reporting
- Using Firebase Remote Config for A/B testing
- Using Mixpanel for analytics
- Adding Internationalization
- Adding introduction screens ...
Then run the following command to setup your firebase project
apparence_cli firebase .where . is the root of your flutter project generated by the previous command.
🔥 You can skip the rest of this guide if you used the firebase command above as everything will be done for you.
2 - Create Firebase project
Install firebase cli
Apparence_cli normally install firebase cli for you during the setup but if you need to install it manually here is how to do it.
On Mac, you can install it with
brew install firebase-cliOr with npm
npm install -g firebase-toolsCheck the official documentation for other OS.
Login to firebase
firebase loginFlutterfire cli
Flutter fire cli is a tool to generate firebase configuration files with flutter.
Install it with
dart pub global activate flutterfire_cliOn Mac, also install xcodeproj
sudo gem install xcodeprojNote: FlutterFire use the xcodeproj gem to modify the iOS project file with the Firebase configuration.
Configure your project (dev environment here)
# flutterfire configure --project=YOUR_PROJECT_NAME --out lib/firebase_options_[environment].dart
# Ex:
flutterfire configure --project=apparencekit-pro --out lib/firebase_options_dev.dart
This will output a configuration file into your lib folder.
Create as many environments as you need.
Remove firebase generated files
I recommend you to remove any firebase generated files from Android / iOS folders.
Flutter recently added a new way to configure firebase, relying on dart code.
- remove the google-services.json file from the android/app folder
- remove the GoogleService-Info.plist file from the ios/Runner folder
- remove the id 'com.google.gms.google-services' from the android/build.gradle file
Setup firebase
import 'package:apparence_kit/firebase_options_dev.dart' as firebase_dev;
...
void main() async {
    ...
    await env.when(
        dev: (_) => Firebase.initializeApp(
            options: firebase_dev.DefaultFirebaseOptions.currentPlatform,
        ),
        ...
    );
}
3 - Deploy firebase functions
Once you purchase Core or Unlimited plan, you will have access to the firebase functions boilerplate. You can fetch it from here
The firebase functions includes
- Handling notifications
Pre-requisites
You must have firebase tools installed globally
npm install -g firebase-toolsGetting Started
- clone this repo (or create a new one from this template)
- install dependencies
npm installDeploy functions
firebase deploy --only functionsDeploy firestore rules
Firestore rules are included in the firebase functions repo. Firestore rules are security rules that define who can access your data and what they can do with it. You will have to customize them to fit your needs each time you add a new collection.
Deploy rules with firebase CLI
firebase deploy --only firestore:rulesRevenueCat webhook
If you choosed to use the subscription module you need to deploy the webhook function. Also you need to have a RevenueCat account and a subscription plan. Check the monetization guide for more details.
💡 You can pass this step for now and do it later if you want...
You need to deploy the RevenueCat webhook to handle the subscription events within firebase. We sync the subscription status in the firestore database.
1 - deploy the webhook secret
firebase functions:config:set revenuecat.token="your_bearer_token"2 - Enable the subscription function
Open the index.ts and uncomment the line that imports the webhook function
// uncomment this line
// exports.subscriptions = require("./subscriptions/subscriptions_functions");
Then deploy the functions
firebase deploy --only functions4 - Android setup
Android project is ready to use on development mode.
For production mode please read the deploy your app on Play store guide
5 - iOS setup
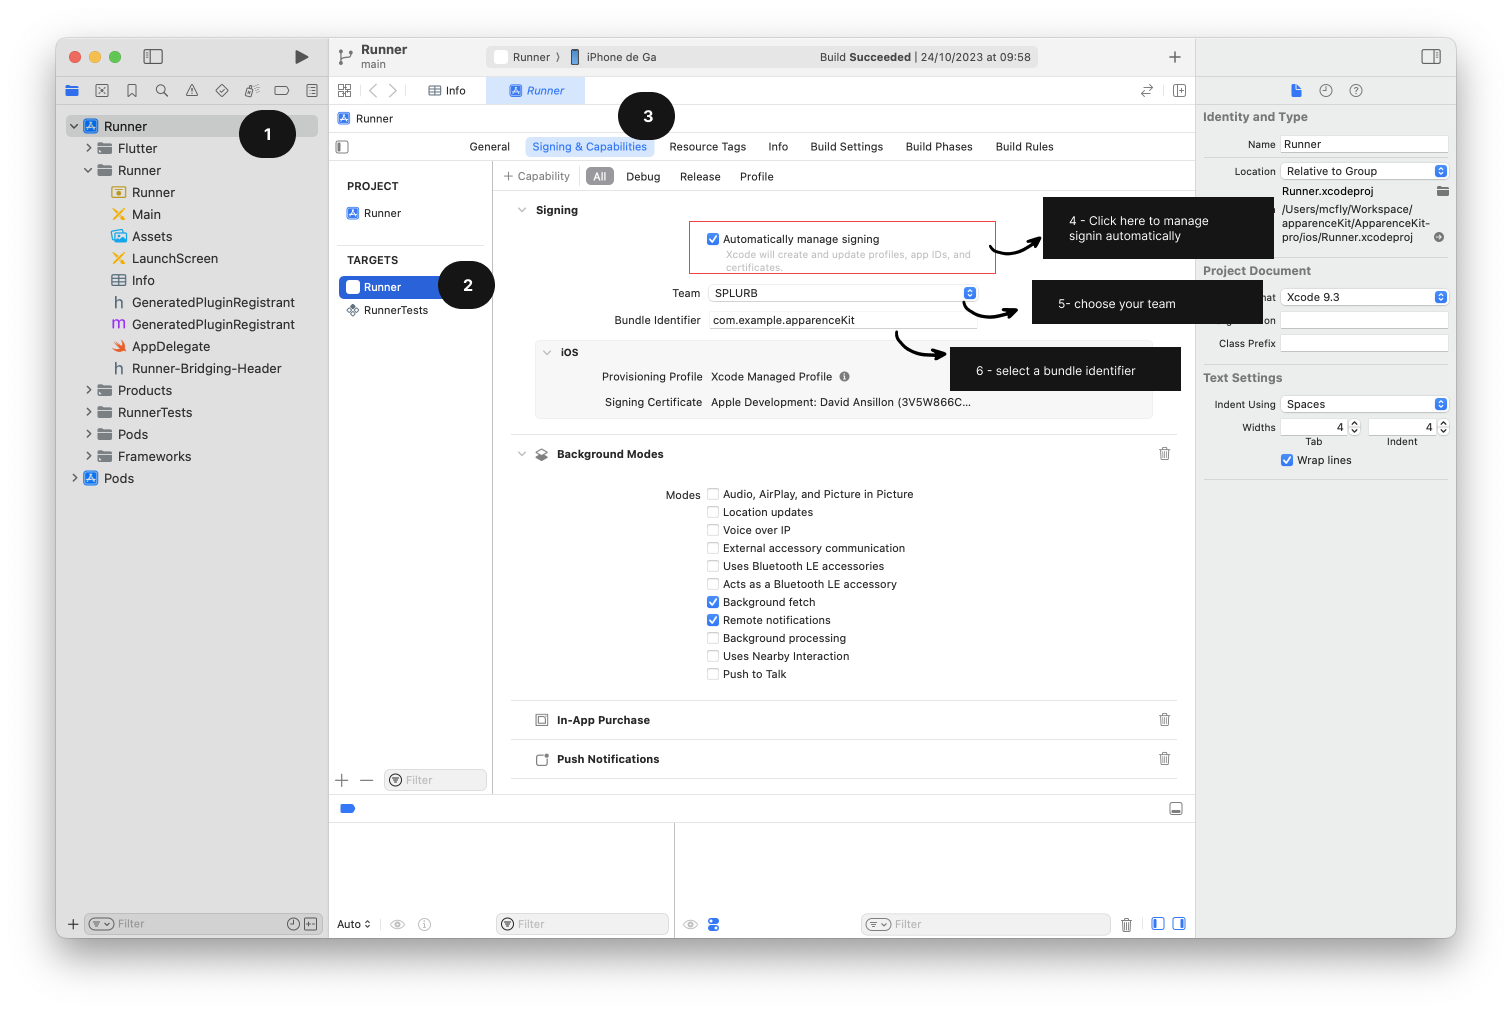
Open the ios folder with Xcode and configure your app with your bundle id, team, and provisioning profile.
 After that everything should be ready to use on development mode.
For production mode please read the deploy your app on App Store guide
Note: You need to have a paid Apple Developer account to deploy your app on the App Store or Sign your app with your own certificate.